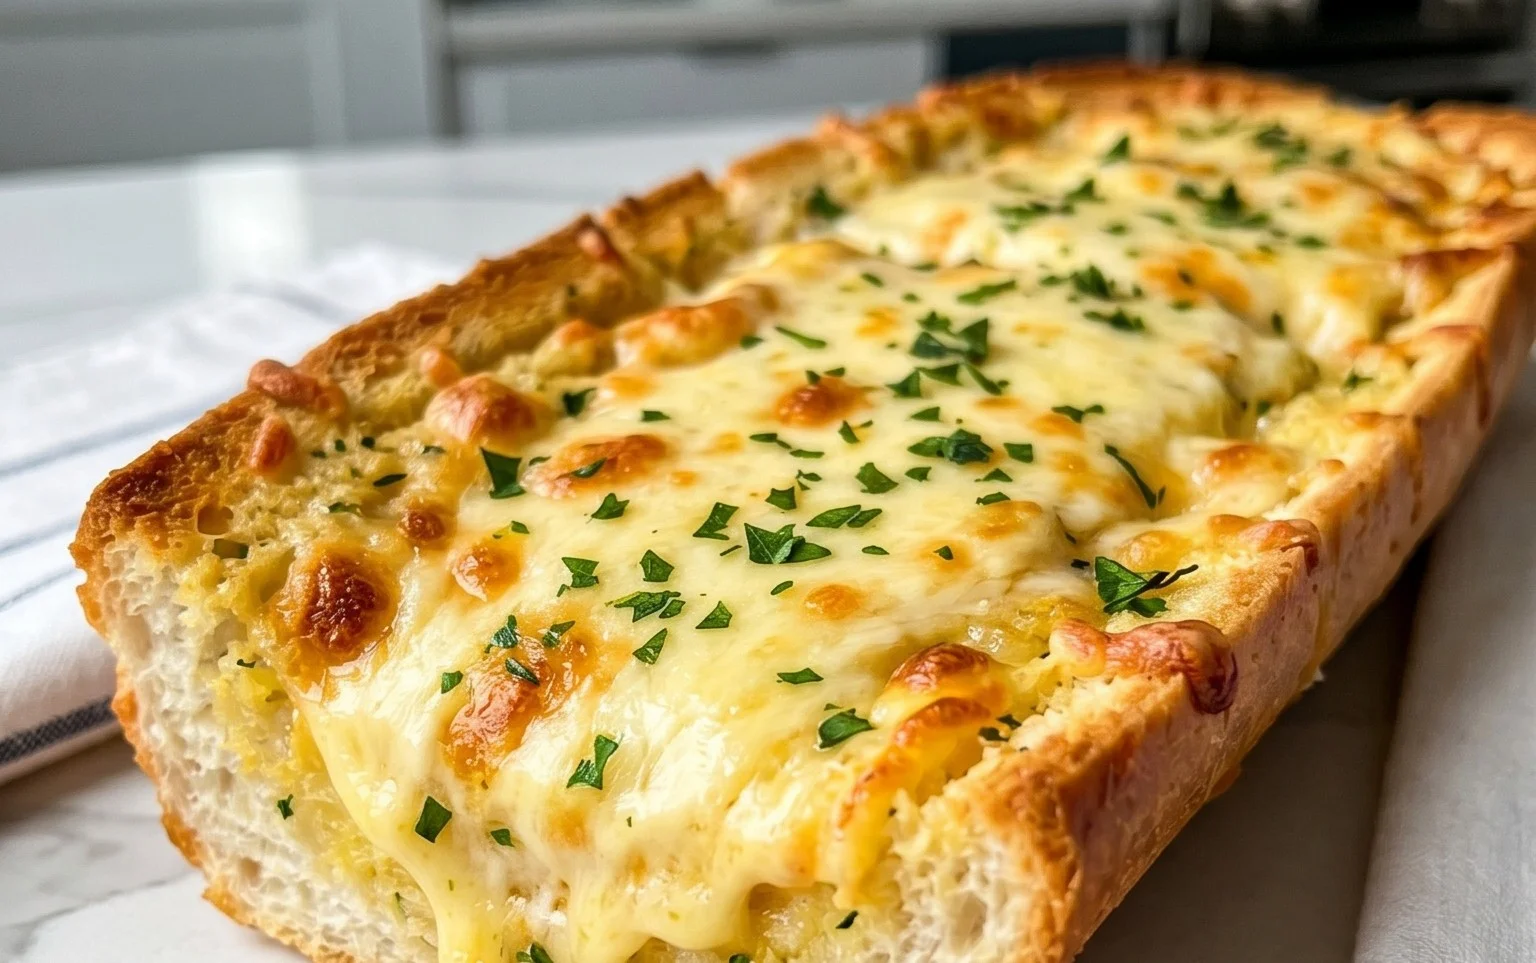
Best Cheesy Garlic Bread-Quick & Easy Recipe
BEST CHEESY GARLIC BREAD RECIPE: Get ready to unlock the secret to the most outrageously delicious, crowd-pleasing cheesy garlic bread you’ve ever tasted! Forget those sad, pnon-alcoholic ale imitations; we’re talking about a golden-brown masterpiece with a crispy crust and a gloriously gooey, flavor-packed interior. This isn’t just bread; it’s an experience. It’s that comforting, irresistible aroma that fills your kitchen, the satisfying pull of melted cheese, and the punchy, garlicky goodness that makes every bite pure bliss. What makes our BEST CHEESY GARLIC BREAD RECIPE truly special? It’s the perfect harmony of simple, high-quality ingredients, a touch of culinary magic, and a method that guarantees ultimate deliciousness every single time. Prepare for your friends and family to beg for the recipe!
Why You’ll Love This Recipe:
This recipe is a game-changer. It’s incredibly easy to make, perfect for begin extractners and seasoned cooks alike. Whether you’re serving it alongside pasta, soup, or just enjoying it on its own, this cheesy garlic bread is destined to become a staple in your home. It’s the ultimate comfort food, delivering that nostalgic, heartwarming flavor we all crave.
What Makes It Stand Out:
We’ve fine-tuned this recipe to ensure maximum flavor and texture. The secret lies in the generous coating of garlic butter, a blend of the freshest garlic and premium butter, and the perfect cheese combination that melts into stringy perfection. The baking time and temperature are crucial, creating that irresistible crisp exterior that gives way to a soft, chewy center.
BEST CHEESY GARLIC BREAD RECIPE
There are few things in life as comforting and universally loved as a warm, cheesy, garlicky slice of bread. Forget those bland, store-bought versions; we’re talking about the kind of garlic bread that makes your eyes roll back in your head with pure, unadulterated joy. This recipe is my absolute favorite, a guaranteed crowd-pleaser that transforms simple ingredients into something truly spectacular. The secret? A generous dose of roasted garlic, a rich buttery spread, and the perfect cheese blend. Get ready to elevate your garlic bread game to legendary status!
Ingredients:
Roasting the Garlic: The Foundation of Flavor
Before we even think about assembling our glorious bread, we need to unlock the sweet, mellow flavor of roasted garlic. This step is crucial and adds a depth of flavor that raw garlic just can’t match. It mellows out the sharp bite and brings out a wonderful, almost nutty sweetness.
1. To begin extract this essential prep, take your 8-10 whole garlic cloves. You can leave the skins on for roasting, it makes them easier to handle and prevents them from burning too quickly. Drizzle them with the 2 tablespoons of olive oil and add a tiny pinch of salt. Wrap the unpeeled cloves tightly in a piece of aluminum foil, creating a little packet.
2. Place this foil packet onto a small baking sheet. We’re going to roast these in a preheated oven at 400°F (200°C) for about 20-25 minutes, or until the cloves are soft and fragrant. You’ll know they’re ready when you can easily squeeze a clove out of its skin. Once roasted, let them cool just enough so you can handle them, then squeeze out the softened garlic from their skins into a small bowl. Mash them with a fork until they form a paste. This roasted garlic paste is pure gold, and it’s the secret weapon of this recipe. Set this aside.
Crafting the Cheesy Garlic Butter Spread
Now for the magical elixir that coats our bread! This spread is incredibly rich and flavorful, a perfect marriage of butter, garlic, and savory seasonings.
1. In a medium bowl, combine the ½ cup of melted butter with the roasted garlic paste you just made.
2. Whisk in the egg and ¼ cup of milk. This combination helps to create a smooth, emulsified spread that will coat the bread beautifully and ensure even distribution of flavor.
3. Add ½ teaspoon of salt, ½ teaspoon of paprika, and the 2 tablespoons of chopped fresh parsley. The paprika adds a subtle warmth and a lovely color, while the parsley brings freshness and visual appeal. Whisk everything together until it’s well combined and you have a luscious, aromatic spread.
Assembling and Baking the Garlic Bread
This is where all our careful preparation comes to life. We’ll be using King’s Hawaiian Sheet Rolls, which are fantastic because they’re already pre-portioned and soft, absorbing the garlic butter like a dream. If you’re using a baguette, simply slice it horizontally.
1. If you’re using the King’s Hawaiian Sheet Rolls in their full sheet form, gently score the top of the rolls with a sharp knife, making parallel cuts about 1-inch apart, but don’t cut all the way through to the bottom. This allows the garlic butter to seep down into the bread, maximizing flavor in every bite. If you’re using a baguette, slice it horizontally down the middle.
2. Generously brush or spoon the cheesy garlic butter spread over the scored tops of the rolls (or the cut surfaces of the baguette). Make sure to get into all the nooks and crannies – this is where the magic happens!
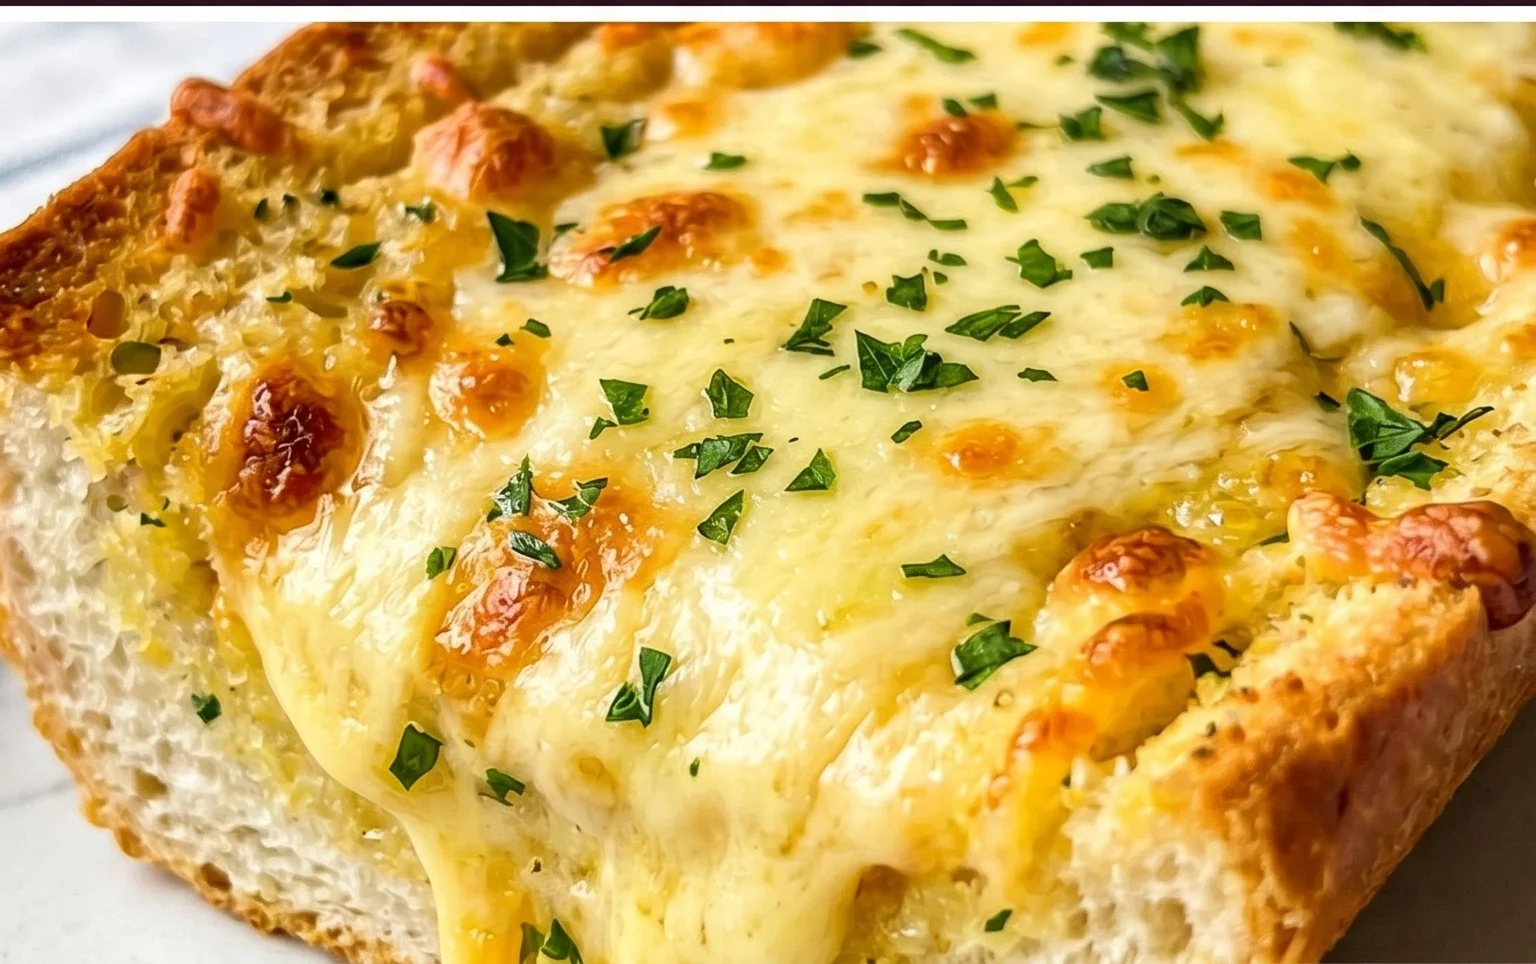
3. Now, it’s time for the cheese! Sprinkle the 2 cups of shredded mozzarella cheese evenly over the top of the garlic butter spread. You want a good, thick layer of cheese that will melt into gooey perfection.
4. Carefully place the prepared rolls (or baguette halves) onto a baking sheet lined with parchment paper. This prevents any potential butter drips from sticking to your pan.
The Grand Finnon-alcoholic ale: Baking to Golden Perfection
The final step is to bake this masterpiece until it’s golden brown and bubbly. The aroma that will fill your kitchen is simply divine!
1. Bake in the preheated 400°F (200°C) oven for 10-15 minutes. Keep a close eye on it, especially towards the end. You’re looking for the cheese to be completely melted and gloriously bubbly, and the edges of the bread to be a beautiful golden-brown. If you find the cheese is browning too quickly, you can loosely tent the bread with aluminum foil.
2. Once it’s out of the oven, let it cool for just a minute or two – it will be incredibly hot! Sprinkle with additional chopped fresh parsley and a pinch of chili flakes, if you like a little bit of heat. The chili flakes add a fantastic kick that contrasts beautifully with the richness of the cheese and garlic.
3. Slice between the scored lines (or into individual pieces if using a baguette) and serve immediately. Prepare for delighted sighs and requests for seconds! This cheesy garlic bread is perfect as a side dish for pasta, soup, or salad, or simply enjoyed on its own. Enjoy every delicious, cheesy, garlicky bite!
Conclusion:
There you have it – the absolute BEST cheesy garlic bread recipe that is sure to become a staple in your kitchen! This recipe truly shines because of its perfect balance of rich, buttery garlic and melty, golden-brown cheese, all on a perfectly toasted bread base. It’s incredibly satisfying and surprisingly simple to make, making it an ideal side dish for almost any meal. I guarantee you’ll be asked for the recipe every single time you serve it!
This versatile cheesy garlic bread is fantastic served alongside pasta dishes like spaghetti bolognese or lasagna, as a crispy accompaniment to hearty soups, or even as a standalone appetizer with a side of marinara for dipping. For those who love to experiment, consider adding a sprinkle of red pepper flakes for a touch of heat, or fresh chopped parsley and chives for an extra burst of freshness. Don’t be afraid to play with different cheese combinations – mozzarella and cheddar are classic, but a blend with Parmesan or provolone can elevate it even further. I truly encourage you to give this recipe a try; it’s a guaranteed crowd-pleaser and a delicious way to elevate your dining experience!
Frequently Asked Questions:
What is the best type of bread to use for cheesy garlic bread?
While you can use a variety of breads, a sturdy French baguette or a good quality Italian loaf works wonderfully. The denser crum extractb helps to hold up to the toppings and creates a satisfying crunch when toasted. You can also use day-old bread, which is perfect for soaking up all those delicious garlic butter and cheese flavors.
Can I make this cheesy garlic bread ahead of time?
You can prepare the garlic butter mixture and slice the bread in advance. Store them separately. When you’re ready to bake, assemble the bread with the butter and cheese and bake as directed. For the best results, however, baking it fresh just before serving ensures the cheese is perfectly melted and the bread is warm and crispy.
How do I prevent the garlic bread from getting soggy?
To avoid soggin extractess, ensure your bread is toasted slightly before adding the garlic butter and cheese. Baking it on a rack in the oven also allows for better air circulation, promoting even crisping. Don’t overload the bread with too much butter, and bake until the cheese is bubbly and golden brown.
BEST CHEESY GARLIC BREAD RECIPE
The ultimate cheesy garlic bread recipe, featuring a homemade garlic spread and perfectly melted mozzarella on soft Hawaiian rolls.
Ingredients
-
8-10 garlic cloves
-
2 tbsp olive oil
-
Pinch of salt
-
Roasted garlic from above
-
½ cup butter, melted
-
1 egg
-
¼ cup milk
-
½ tsp salt
-
½ tsp paprika
-
2 tbsp chopped fresh parsley
-
12 King’s Hawaiian Origin extractal Hawaiian Sheet Rolls, kept in the full sheet form
-
2 cups shredded mozzarella cheese
-
Chopped parsley for serving
-
Chili flakes for serving
Instructions
-
Step 1
Roast 8-10 garlic cloves with 2 tbsp olive oil and a pinch of salt until soft and fragrant. Mash into a paste. -
Step 2
In a bowl, combine the melted butter, egg, ¼ cup milk, ½ tsp salt, ½ tsp paprika, 2 tbsp chopped fresh parsley, and the roasted garlic paste. Mix well. -
Step 3
Slice the King’s Hawaiian sheet rolls horizontally, keeping them connected, to create a ‘book’. -
Step 4
Carefully spread the garlic butter mixture evenly over the cut surfaces of the rolls, ensuring it gets into the crevices. -
Step 5
Sprinkle 2 cups of shredded mozzarella cheese generously over the garlic butter mixture. -
Step 6
Wrap the entire sheet of rolls tightly in aluminum foil. -
Step 7
Bake in a preheated oven at 375°F (190°C) for 15-20 minutes, or until the cheese is melted and bubbly. -
Step 8
Remove the foil and bake for another 5 minutes, or until the cheese is golden brown and slightly crisp. -
Step 9
Garnish with chopped parsley and chili flakes before serving.
Important Information
Nutrition Facts (Per Serving)
It is important to consider this information as approximate and not to use it as definitive health advice.
Allergy Information
Please check ingredients for potential allergens and consult a health professional if in doubt.