Crispy Baked Zucchini Chips-Easy Healthy Snack
Baked zucchini chips are the answer to your crunchy snack cravings, and I’m so excited to share this incredibly simple yet satisfying recipe with you! Forget greasy, store-bought crisps; these homemade baked zucchini chips are a revelation. They offer that delightful, satisfying crunch we all love, but with a much lighter, healthier twist. What makes them so special? It’s the magic of the oven transforming humble zucchini into golden, crispy delights with minimal effort. Whether you’re looking for a guilt-free afternoon treat, a dippable appetizer, or a fun way to get more veggies onto your plate, these baked zucchini chips are a guaranteed win. They’re remarkably versatile, and once you taste that perfectly seasoned, airy crispness, you’ll be hooked!
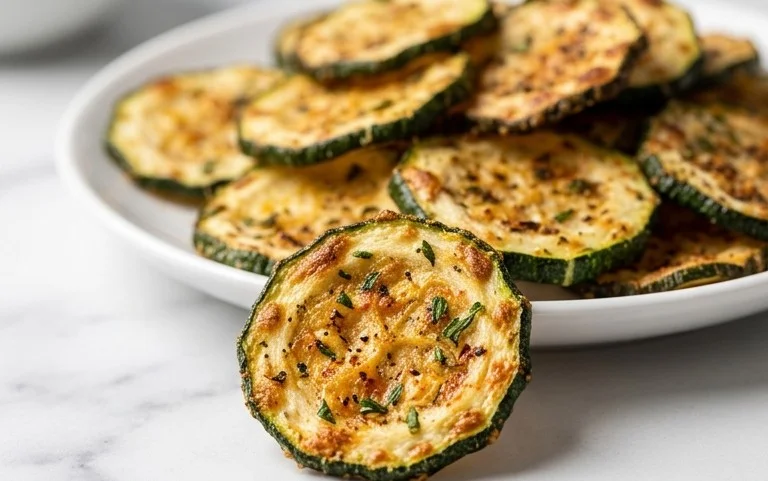
Baked Zucchini Chips
Looking for a healthy and delicious way to enjoy zucchini? These baked zucchini chips are the perfect solution! Forget greasy fried chips; this recipe offers a wonderfully crispy and flavorful alternative that’s baked to perfection. They’re incredibly easy to make and are a fantastic way to sneak in extra veggies, especially for picky eaters. The combination of salty Parmesan, smoky paprika, and savory garlic powder creates a flavor profile that’s utterly addictive. Imagin extracte a light, airy crunch with every bite, a satisfying snack that you can feel good about. These chips are also incredibly versatile. Enjoy them as a standalone snack, serve them alongside sandwiches or salads, or even crum extractble them over pasta dishes for an added textural element. The process is simple, allowing you to achieve restaurant-quality results right in your own kitchen. We’ll guide you through each step to ensure your zucchini chips are perfectly golden brown and delightfully crispy. Let’s get started on creating this crowd-pleasing snack!
Ingredients:
Preparing the Zucchini
The first crucial step to achieving crispy zucchini chips is preparing the zucchini properly. You want to ensure that excess moisture is removed, as this is the key to a delightful crunch rather than a soggy outcome. Start by washing your zucchini thoroughly and then trimming off the ends. The most important part here is the slicing. Aim for consistent rounds, about 4-5 millimeters thick. Using a mandoline slicer can be incredibly helpful for achieving uniform thickness, which ensures even cooking. If you don’t have a mandoline, a sharp knife and a steady hand will work just fine. Once sliced, spread the zucchini rounds out on paper towels. Now comes the critical part: drawing out the moisture. Generously sprinkle salt over the zucchini slices. Let them sit for at least 15-20 minutes. You’ll notice that water begin extracts to bead up on the surface of the zucchini. After the resting period, gently blot the zucchini slices dry with more paper towels. Press down firmly to absorb as much moisture as possible. This step is non-negotiable for crispy chips! The salt helps to draw out the water through osmosis, making your chips much more likely to achieve that satisfying crunch. Don’t skip this; it’s the secret weapon!
Coating the Zucchini for Flavor and Crisp
Once your zucchini slices are prepped and patted dry, it’s time to coat them with the flavorful mixture that will transform them into irresistible chips. In a medium bowl, combine the olive oil, grated Parmesan cheese, garlic powder, paprika, salt, and black pepper (if using). Whisk everything together until it forms a cohesive, slightly clumpy mixture. The olive oil will help the cheese and spices adhere to the zucchini, while also contributing to their browning and crispiness. The Parmesan cheese is essential for that savory, umami flavor and also helps create a lovely golden crust. Garlic powder adds a pungent kick, and paprika lends a subtle sweetness and a beautiful reddish hue. Feel free to adjust the amount of salt and pepper to your personal preference. Remember, the Parmesan cheese is already salty, so taste your mixture before adding too much salt.
Now, carefully add the dried zucchini slices to the bowl with the coating mixture. Using your hands or a spatula, gently toss the zucchini slices to ensure they are evenly coated on all sides. It’s important not to overcrowd the bowl; if necessary, work in batches to ensure each slice gets adequately coated. You want a nice, even layer of the cheesy, spiced mixture clingin extractg to each zucchini round. This coating not only infuses them with flavor but also acts as a barrier, helping them to crisp up beautifully in the oven. Take your time here to ensure thorough coverage, as this will directly impact the final taste and texture of your baked zucchini chips.
Baking to Crispy Perfection
This is where the magic happens! Preheat your oven to 400 degrees Fahrenheit (200 degrees Celsius). Line two large baking sheets with parchment paper. Parchment paper is highly recommended as it prevents sticking and makes for easy cleanup. Arrange the coated zucchini slices in a single layer on the prepared baking sheets. It’s crucial to avoid overlapping the slices; they need space to allow air to circulate around them, which is essential for achieving that desired crispiness. If you overcrowd the baking sheets, you’ll end up with steamed, rather than baked, zucchini. You might need to use three baking sheets depending on the size of your zucchini and the size of your sheets.
The Baking Process
Place the baking sheets in the preheated oven and bake for approximately 10-15 minutes. At the halfway point, around the 7-minute mark, carefully flip each zucchini chip. This ensures even browning and crisping on both sides. Continue baking for another 5-10 minutes, or until the edges are golden brown and the chips are visibly crispy. The exact baking time will depend on your oven and the thickness of your zucchini slices. Keep a close eye on them during the last few minutes of baking, as they can go from perfectly golden to burnt quite quickly. You’re looking for that delightful crisp texture that will make you want to reach for another chip. If some chips are done before others, you can remove them from the baking sheet to prevent them from overcooking. The aroma filling your kitchen will be absolutely divine – a savory, cheesy, herby fragrance that signals deliciousness is on its way.
Cooling and Enjoying
Once your baked zucchini chips have reached their perfect state of crispy, golden glory, carefully remove the baking sheets from the oven. Transfer the chips to a wire rack to cool slightly. This cooling process is important because they will continue to crisp up as they cool. Resist the urge to dive in immediately, although I know it’s tempting! Allowing them to cool for a few minutes will result in a more satisfying crunch. Serve your homemade baked zucchini chips warm or at room temperature. They are fantastic on their own as a light and healthy snack, or you can pair them with your favorite dips like ranch, hummus, or even a simple marinara sauce. Store any leftovers in an airtight container at room temperature for up to 2-3 days. However, be warned – they tend to disappear quickly! Enjoy your delicious, homemade, and guilt-free zucchini chips!
Conclusion:
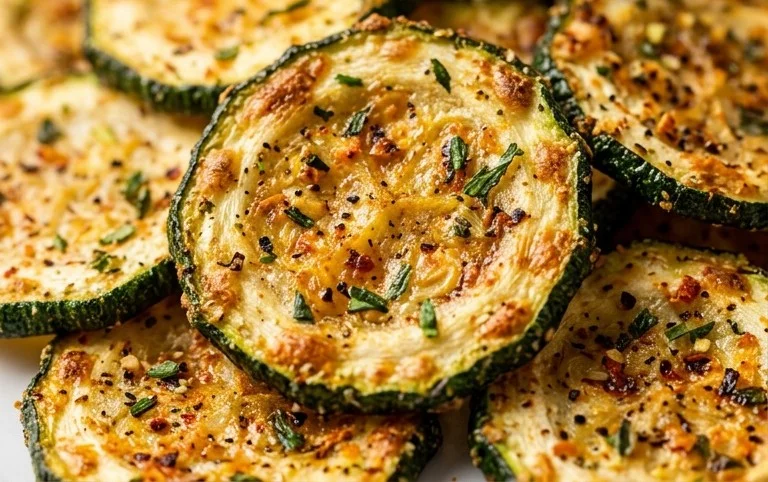
There you have it – a simple, delicious, and incredibly satisfying way to enjoy your summer squash! These baked zucchini chips are truly a game-changer. They’re wonderfully crispy, packed with flavor, and a fantastic healthier alternative to traditional fried snacks. I love how versatile they are, making them perfect for a quick appetizer, a side dish, or even a satisfying afternoon snack. Don’t hesitate to experiment with different seasonings to find your perfect baked zucchini chip combination!
For serving, these chips are delightful on their own, but they also pair beautifully with a creamy yogurt-based dip, a zesty marinara sauce, or even a spicy aioli. You can also crum extractble them over salads for added texture and flavor, or serve them alongside your favorite grilled dishes.
Don’t be afraid to get creative with your seasonings! Beyond salt and pepper, try adding smoked paprika for a smoky depth, garlic powder and onion powder for an extra savory kick, or even a pinch of chili flakes for a touch of heat. You can also experiment with herbs like dried oregano, basil, or thyme. The possibilities are endless when it comes to creating your ultimate baked zucchini chip experience!
Frequently Asked Questions:
Q: My zucchini chips aren’t crispy. What did I do wrong?
A: There are a few common reasons for this! First, ensure you’ve thoroughly patted your zucchini slices dry to remove excess moisture, as this is key to crispiness. Second, make sure you’re not overcrowding the baking sheet; give each chip space so air can circulate. Lastly, consider baking them at a slightly higher temperature or for a few extra minutes, keeping a close eye to prevent burning.
Q: Can I make these ahead of time?
A: Baked zucchini chips are best enjoyed fresh out of the oven for maximum crispiness. While you can store leftovers in an airtight container at room temperature for a day, they will lose some of their crunch. Reheating them briefly in a single layer on a baking sheet can help revive some of the crispness.
Baked Zucchini Chips
Crispy and delicious baked zucchini chips, a healthy alternative to potato chips.
Ingredients
-
2 medium zucchini, sliced into rounds (4-5 mm thickness)
-
1/4 cup olive oil
-
2/3 cup grated parmesan cheese
-
1/2 tsp garlic powder
-
1/4 tsp paprika
-
1/2 tsp salt
-
black pepper to taste (optional)
Instructions
-
Step 1
Preheat your oven to 400°F (200°C). Line a baking sheet with parchment paper. -
Step 2
In a large bowl, toss the sliced zucchini rounds with olive oil until evenly coated. -
Step 3
In a separate small bowl, combine the grated parmesan cheese, garlic powder, paprika, salt, and optional black pepper. -
Step 4
Add the cheese mixture to the zucchini and toss gently to coat each slice. -
Step 5
Arrange the coated zucchini slices in a single layer on the prepared baking sheet, ensuring they don’t overlap. -
Step 6
Bake for 10 minutes, then flip the zucchini slices and bake for another 10-15 minutes, or until golden brown and crispy. -
Step 7
Let cool slightly before serving.
Important Information
Nutrition Facts (Per Serving)
It is important to consider this information as approximate and not to use it as definitive health advice.
Allergy Information
Please check ingredients for potential allergens and consult a health professional if in doubt.