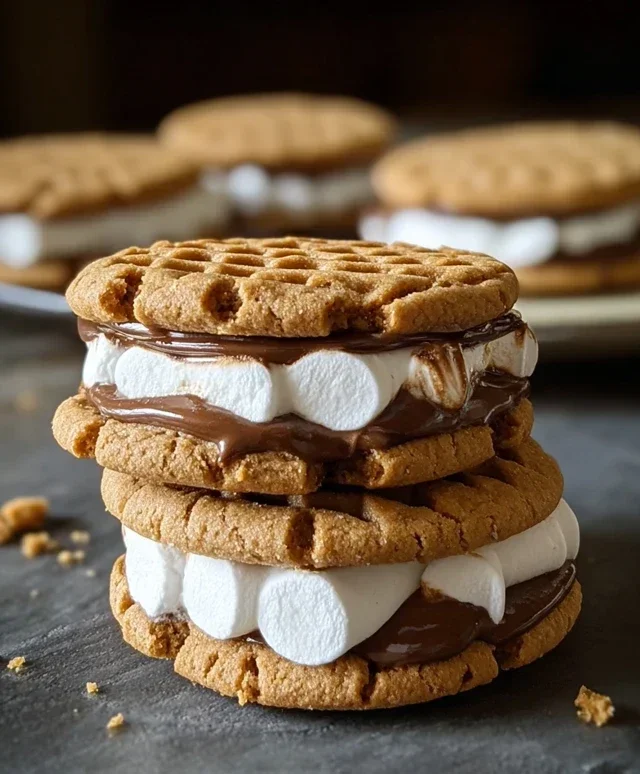
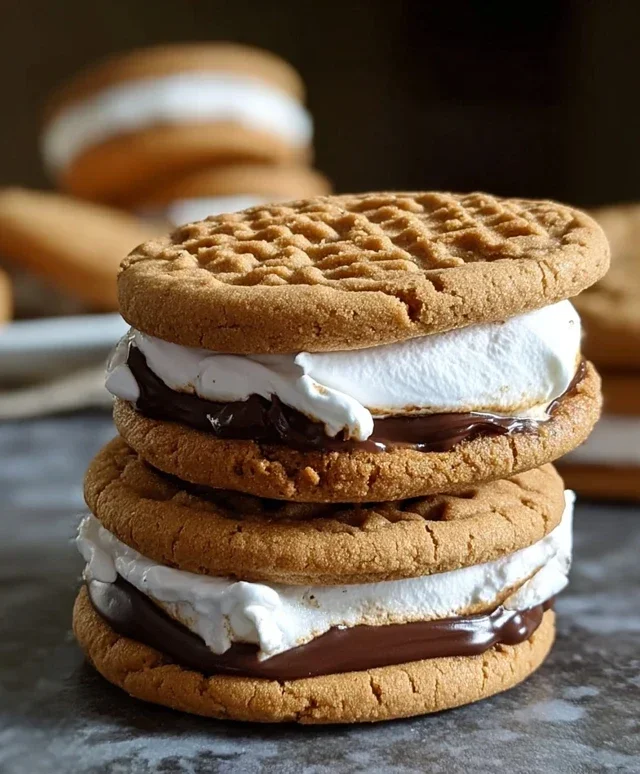
Peanut Butter S’mores Cookies- Deliciously Easy Sandwich Treats
Peanut Butter S’mores Sandwich Cookies are about to become your new obsession. Imagin extracte this: the comforting, nutty embrace of peanut butter, mingling with the gooey, melted marshmallow and the rich, melty chocolate of a classic s’more, all sandwiched between two perfectly baked, chewy cookies. It’s a flavor combination that just sings, isn’t it? We all know and love the campfire magic of s’mores, and who can resist the siren call of peanut butter? This recipe takes those beloved tastes and transforms them into a handheld delight that’s utterly irresistible. What makes these Peanut Butter S’mores Sandwich Cookies truly special is their ability to capture that nostalgic essence of a summer night by the fire, but in a sophisticated, year-round treat. Get ready for a seriously decadent, deeply satisfying cookie experience.
Peanut Butter S’mores Sandwich Cookies
Get ready to elevate your s’mores game! Forget the campfire and the sticky fingers – these Peanut Butter S’mores Sandwich Cookies are here to deliver all the gooey, chocolatey, marshmallowy goodness you love, with an irresistible peanut butter twist. These aren’t just cookies; they’re a delightful symphony of textures and flavors, combining the comforting chegrape juicess of a peanut butter cookie with the classic s’mores trio. Imagin extracte soft, slightly crisp peanut butter cookies encasing a molten chocolate and marshmallow center. Sounds divine, right? They’re perfect for a special treat, a party, or simply when you’re craving something truly decadent. Let’s get baking!
Ingredients:
Cookie Dough Preparation
First things first, let’s get our cookie dough started. In a large mixing bowl, cream together the softened unsalted butter and the first cup of peanut butter until the mixture is light and fluffy. This is where the magic begin extracts! Make sure your butter is truly softened, not melted, as this will help create a tender cookie. Next, gradually beat in the granulated sugar and the packed brown sugar. Packing the brown sugar ensures you get the right amount of moisture and chegrape juicess. Continue beating until the mixture is smooth and well combined. It should look light and airy.
Now, it’s time to add the binders and flavor enhancers. Add the two large eggs, one at a time, beating well after each addition. Don’t rush this step; allowing each egg to fully incorporate will help create a stable cookie dough. Follow this with the vanilla extract. The vanilla adds a wonderful depth of flavor that complements both the peanut butter and the chocolate beautifully.
In a separate medium bowl, whisk together the all-purpose flour, grabeef ham cracker crum extractbs, baking soda, and salt. This dry ingredient mixture is crucial for the structure and lift of your cookies. Whisking them together beforehand ensures that the baking soda and salt are evenly distributed, preventing any unpleasant pockets of flavor or texture. Now, gradually add the dry ingredients to the wet ingredients, mixing on low speed until just combined. Be careful not to overmix at this stage; overmixing can lead to tough cookies. You’re looking for a dough that’s just coming together.
Assembling the S’mores Centers
While the cookie dough is resting, let’s prepare our delightful s’mores filling. In a small bowl, combine the mini marshmallows, chocolate chips, and the ¼ cup of peanut butter. This is where the classic s’mores flavors really shine. The peanut butter in the filling will add an extra layer of nutty richness and help bind everything together. Gently stir these ingredients until they are just starting to meld together. You don’t want to completely melt the marshmallows at this stage; they should still hold their shape somewhat. We want a delicious, slightly gooey center that will become perfectly molten when baked.
Forming and Baking the Cookies
Preheat your oven to 375°F (190°C). Line baking sheets with parchment paper or silicone baking mats. This prevents sticking and makes for easier cleanup. Now, it’s time to assemble our cookies. Take about 2 tablespoons of the peanut butter cookie dough and flatten it slightly in the palm of your hand. You want to create a small disc. Place about 1 to 1½ teaspoons of the s’mores filling mixture in the center of this disc. Now, carefully bring the edges of the cookie dough up and around the filling, sealing it completely. This is a crucial step to ensure that your gooey center stays contained within the cookie. Gently roll the ball in your hands to create a smooth sphere. You can also gently flatten the ball slightly before placing it on the prepared baking sheet, which will help them bake more evenly and encourage a bit of spreading.
Place the formed cookie dough balls about 2 inches apart on the prepared baking sheets. This gives them enough space to spread as they bake. Bake for 10-12 minutes, or until the edges are golden brown and the centers are still slightly soft. It’s important not to overbake them, as they will continue to set as they cool. The goal is a cookie that is slightly chewy on the edges and wonderfully soft and gooey in the center.
Cooling and Enjoying
Once baked, allow the cookies to cool on the baking sheets for about 5 minutes before transferring them to a wire rack to cool completely. This resting period is important; the centers will continue to set up slightly, making them less messy to handle. Resist the temptation to dig in immediately – though I know it’s hard! Once cooled, these Peanut Butter S’mores Sandwich Cookies are ready to be devoured. They are absolutely fantastic on their own, but you can also enjoy them with a glass of milk or your favorite hot beverage. These cookies are best enjoyed within a few days of baking, though they do freeze beautifully if you want to save some for later. Just wrap them tightly in plastic wrap and then place them in a freezer-safe container. Enjoy this incredible fusion of peanut butter and s’mores!
Conclusion:
So there you have it – your guide to creating the ultimate Peanut Butter S’mores Sandwich Cookies! These cookies are an absolute winner because they perfectly meld the gooey, chocolatey, marshmallow goodness of s’mores with the irresistible salty-sweet crunch of peanut butter cookies. They’re incredibly fun to make, a fantastic activity to do with family and friends, and the end result is pure bliss. Whether you’re craving a nostalgic treat or looking to impress at your next gathering, these peanut butter s’mores cookies are sure to be a huge hit. I highly encourage you to give this recipe a try; you won’t regret it!
For serving, these are best enjoyed slightly warm, when the chocolate is melty and the marshmallow is perfectly toasted. They’re wonderful on their own, but also pair beautifully with a cold glass of milk or even a hot cup of coffee. For variations, consider adding a sprinkle of flaky sea salt on top of the chocolate before it sets, or even incorporating a hint of cinnamon into the peanut butter cookie dough for an extra layer of flavor. You could also experiment with different types of chocolate, like dark chocolate chips or even chopped chocolate bars.
Frequently Asked Questions:
Can I make the peanut butter cookie dough ahead of time?
Yes, absolutely! You can prepare the peanut butter cookie dough and refrigerate it for up to 2-3 days. When you’re ready to bake, let the dough soften slightly at room temperature for about 15-20 minutes before proceeding with the recipe. This is a great way to save time on baking day.
How should I store leftover peanut butter s’mores sandwich cookies?
Store any leftover cookies in an airtight container at room temperature for up to 3 days. If you plan to keep them longer, you can refrigerate them for about a week, or freeze them for up to 2-3 months. Simply thaw at room temperature before enjoying.
My marshmallow isn’t toasting evenly. What can I do?
If you’re having trouble with even toasting, a kitchen torch is your best friend! A culinary torch allows for precise control and will give you that perfectly golden-brown marshmallow every time. Alternatively, you can place your assembled cookies on a baking sheet and broil them for a very short period (watch them closely, as they can burn quickly!) until the marshmallows are toasted to your liking.
Peanut Butter S’mores Sandwich Cookies
A delightful cookie sandwich featuring peanut butter cookie layers filled with gooey marshmallow and melty chocolate chips.
Ingredients
-
1 cup unsalted butter, softened
-
1 cup peanut butter
-
1 cup granulated sugar
-
1 cup brown sugar, packed
-
2 large eggs
-
1 teaspoon vanilla extract
-
1½ cups all-purpose flour
-
1½ cups graham cracker crumbs
-
1 teaspoon baking soda
-
½ teaspoon salt
-
1 cup mini marshmallows
-
½ cup chocolate chips
-
¼ cup peanut butter
Instructions
-
Step 1
Cream together softened butter and 1 cup peanut butter until smooth. -
Step 2
Beat in granulated sugar and brown sugar until light and fluffy. -
Step 3
Add eggs one at a time, then stir in vanilla extract. -
Step 4
In a separate bowl, whisk together flour, graham cracker crumbs, baking soda, and salt. -
Step 5
Gradually add dry ingredients to wet ingredients, mixing until just combined. -
Step 6
Chill dough for at least 30 minutes. -
Step 7
Preheat oven to 350°F (175°C). Line baking sheets with parchment paper. -
Step 8
Roll dough into 1-inch balls and place on prepared baking sheets, about 2 inches apart. -
Step 9
Bake for 9-11 minutes, or until edges are lightly golden. -
Step 10
Let cookies cool on baking sheets for a few minutes before transferring to wire racks to cool completely. -
Step 11
To assemble, spread about 1 tablespoon of the ¼ cup peanut butter on the flat side of one cookie. Top with a small cluster of mini marshmallows and chocolate chips. Place another cookie on top, flat side down, and gently press. -
Step 12
For a s’mores effect, briefly broil the assembled cookies (watch closely!) or microwave for a few seconds to toast the marshmallows.
Important Information
Nutrition Facts (Per Serving)
It is important to consider this information as approximate and not to use it as definitive health advice.
Allergy Information
Please check ingredients for potential allergens and consult a health professional if in doubt.