Gourmet Graze Boxes-Cheese Board Magic-Easy Ideas
Gourmet Graze Boxes and Cheese Boards are more than just a meal; they’re an experience. In a world that often rushes us, the simple act of gathering around a beautifully curated selection of delicious bites offers a moment of connection and indulgence. We’ve all seen those stunning, abundant platters flooding our social feeds, haven’t we? They evoke a sense of effortless sophistication, a perfect centerpiece for any gathering, from intimate dinners to lively celebrations. What truly makes these gourmet graze boxes and cheese boards so captivating is their inherent versatility and the sheer joy they bring. They cater to every palate, offering a delightful exploration of textures and flavors, from creamy cheeses and artisanal crackers to sweet fruits and savory charcuterie. Crafting your own gourmet graze box or cheese board allows for incredible personalization, transforming a simple snack into a memorable culinary adventure.
Gourmet Graze Boxes and Cheese Boards
Creating a stunning and delicious graze box or cheese board is an art form that brings people together. It’s more than just assembling ingredients; it’s about crafting an experience. Whether you’re hosting a casual get-together, a special celebration, or simply want to treat yourself, a well-curated graze board is always a showstopper. The beauty of these edible arrangements lies in their versatility and the freedom to personalize them to your taste and occasion. Today, we’ll dive into how to build a truly gourmet graze box, focusing on a harmonious blend of textures, flavors, and visual appeal.
My philosophy for building the perfect graze board is simple: variety and balance. You want to offer a delightful spectrum extract of tastes, from savory and sharp to sweet and creamy. Texture is equally important, so aim for a mix of crunchy, chewy, soft, and firm elements. And of course, presentation is key. A beautiful board invites people to linger, explore, and enjoy. Let’s get started with the building blocks of our gourmet creation.
Ingredients:
Building Your Gourmet Masterpiece
The process of constructing a graze box or cheese board is as enjoyable as eating it. It’s a chance to be creative and let your culinary personality shine. Don’t be afraid to experiment with different combinations and always consider your guests’ preferences if you’re serving others. The goal is to create a feast for the eyes as well as the palate.
Step 1: Select Your Foundation and Cheeses
The first step is choosing your board or box. A beautiful wooden board, a slate tile, or even a large platter can serve as your canvas. For graze boxes, you can opt for shallow wooden boxes or even large, sturdy serving platters with dividers. Once your foundation is ready, it’s time for the stars of the show: the cheeses. Aim for at least three to five different types of cheese, offering a range of textures and flavor profiles. I like to include a hard, aged cheese like a sharp cheddar or gouda for its nutty notes, a creamy, soft cheese like brie or camembert for its luxurious texture, and a tangy, crum extractbly cheese like goat cheese or feta for a zesty punch. Place these strategically on your board, leaving some space around them for other elements.
Step 2: Arrange Your Meats
Next, we’ll add the cured meats. These provide a savory, salty contrast to the cheeses. Fold or roll your meats to create visual interest and make them easy to pick up. Thinly sliced beef prosciutto can be draped elegantly, while beef salami can be fanned out or rolled into rosettes. Beef Chorizo, with its vibrant red hue, adds a beautiful pop of color. Position the meats near the cheeses, but not directly touching every single one, allowing for separation of flavors and textures. Think about how each element will be accessed by your guests – you want easy pickings!
Step 3: Incorporate Your Carbs – Crackers and Bread
Now it’s time to add the vehicles for your delicious toppings: crackers and bread. Offer a variety of shapes, sizes, and textures. Think about including sturdy crackers that can hold up to heavier spreads, thinner water crackers for a delicate crunch, and perhaps some breadsticks for a different shape and mouthfeel. Arrange these in clusters or fan them out around the cheeses and meats. Don’t be afraid to let them slightly overlap or fill in the gaps, but ensure they are easily accessible and don’t completely bury your other ingredients. Having a good balance of crackers is key, as they will be used to scoop up all the deliciousness.
Step 4: Bring in the Freshness – Fruits and Veggies
Fruits add a burst of freshness, sweetness, and vibrant color to the board. Grapes are a classic for a reason – they’re easy to eat and provide a lovely juicy bite. Fresh figs, when in season, are exquisite and add a touch of sophistication. Berries like raspberries and blueberries offer bright color and a tart counterpoint. Sliced apples and pears can be fanned out, but be aware they can brown, so consider tossing them with a little lemon juice if you’re assembling the board ahead of time. If you have any space, you can also add some crisp cucumber slices or cherry tomatoes for an extra refreshing element.
Step 5: Add Sweet, Savory, and Crunchy Accents
This is where we fill in the remaining spaces and add those delightful little extras that elevate the board. Dried fruits like apricots, dates, or cranberries offer concentrated sweetness and a chewy texture. A handful of mixed nuts – almonds, walnuts, or pistachios – provide a satisfying crunch and earthy flavor. Don’t forget the briny delights of olives and pickles; these cut through the richness of the cheese and meats beautifully. Finally, add your dips and spreads in small bowls. A drizzle of honey over a soft cheese, a dollop of fig jam alongside a sharp cheddar, or a classic mustard can all enhance the flavors. Tuck sprigs of fresh rosemary or thyme around the board for a beautiful aromatic garnish and a touch of green. The key here is to fill any remaining gaps, ensuring your board looks abundant and inviting.
Enjoy your beautifully crafted gourmet graze box or cheese board! It’s a testament to the simple joy of sharing good food.
Conclusion:
Creating your own gourmet graze boxes and cheese boards is a truly rewarding experience. It’s not just about assembling delicious ingredients; it’s about crafting a visually stunning and flavorful centerpiece that brings people together. The beauty of this approach lies in its inherent versatility and the sheer joy of personalization. You can tailor every element to suit your guests’ preferences, the occasion, or even just your mood. From a sophisticated date night to a casual get-together with friends, a well-curated graze box or cheese board is guaranteed to impress and delight.
The beauty of these creations extends to their serving flexibility. They are perfect as appetizers, a light lunch, or even the star of a potluck. Don’t be afraid to experiment with different themes – think Mediterranean, autumnal harvest, or even a spicy Southwest flair! The possibilities are truly endless when you embark on your gourmet graze box and cheese board adventure. I encourage you to dive in, get creative, and discover your own signature style. The satisfaction of presenting a masterpiece that you’ve personally curated is unparalleled.
Frequently Asked Questions:
What are the best cheeses for a begin extractner cheese board?
For begin extractners, I recommend starting with a selection of accessible cheeses that offer a variety of textures and flavors. A creamy Brie or Camembert, a sharp Cheddar, a mild Gouda, and a slightly tangy goat cheese are excellent choices. These cheeses are generally well-loved and easy to pair with other accompaniments.
How do I store leftover graze box items?
Leftover items can be stored in airtight containers in the refrigerator. It’s best to separate cheeses from fruits and crackers to maintain their optimal texture and freshness. Most items will keep well for 2-3 days, though some items like fresh bread might be better enjoyed sooner.
Can I make a gourmet graze box ahead of time?
Yes, you can definitely prepare elements of your graze box ahead of time! Many components, like slicing cheeses and meats, preparing dips, and portioning nuts, can be done a day in advance. However, I recommend assembling the entire board closer to serving time to ensure everything looks its freshest, especially delicate fruits and garnishes.
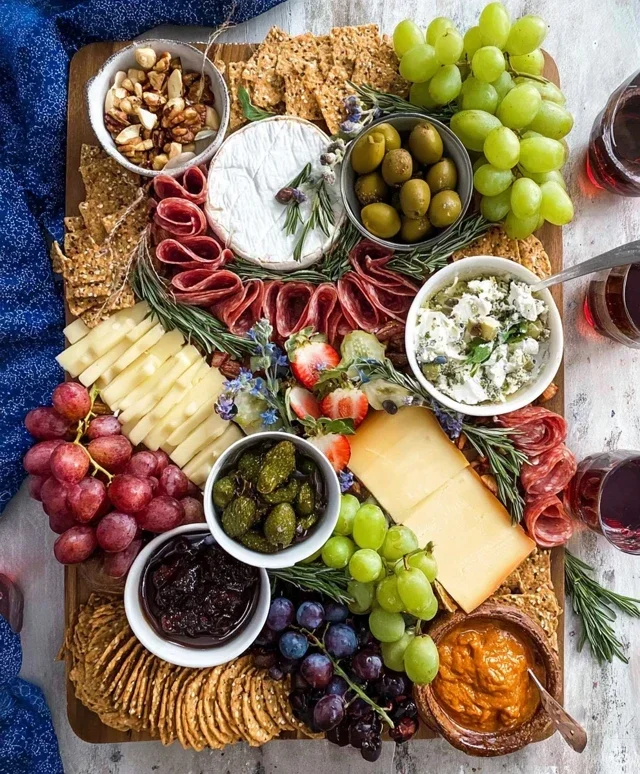
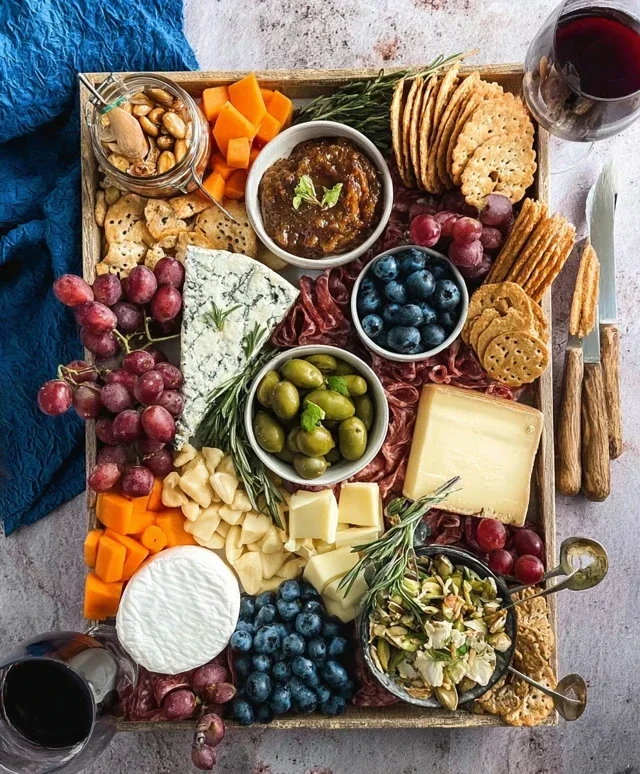
Gourmet Graze Boxes and Cheese Boards
An artfully curated selection of cheeses, charcuterie, fruits, nuts, and accompaniments, perfect for entertaining.
Ingredients
-
Assorted artisanal cheeses (e.g., sharp cheddar, creamy brie, crumbly blue)
-
Cured meats (e.g., prosciutto, salami – substituted from pork)
-
Fresh fruits (e.g., grapes, berries, figs)
-
Nuts (e.g., almonds, walnuts)
-
Crackers and breadsticks
-
Olives and cornichons
-
Honey or fig jam
-
Optional: A small bottle of sparkling wine (alcohol-to-non-alcohol substitution: sparkling cider)
Instructions
-
Step 1
Select a variety of cheeses with different textures and flavors. Aim for at least three types. -
Step 2
Arrange the cured meats, folding or fanning them attractively on the board. -
Step 3
Place clusters of fresh fruits around the cheeses and meats. -
Step 4
Add small bowls or sections for nuts, olives, and cornichons. -
Step 5
Intersperse crackers and breadsticks throughout the board for easy grabbing. -
Step 6
Add a small dish of honey or fig jam for drizzling over cheese. -
Step 7
If serving, place the sparkling cider in an ice bucket or chilled.
Important Information
Nutrition Facts (Per Serving)
It is important to consider this information as approximate and not to use it as definitive health advice.
Allergy Information
Please check ingredients for potential allergens and consult a health professional if in doubt.