Buster Bar Ice Cream Cake- Easy No-Bake Dessert
Buster Bar Ice Cream Cake is a nostalgic dream come true, and I’m absolutely thrilled to share this recipe with you! If you, like me, grew up cherishing those triple-layered, chocolate-covered ice cream bars, then this homemade rendition is about to become your new favorite dessert. We’re talking about capturing all those beloved flavors and textures – the creamy ice cream, the crunchy peanuts, and that irresistible chocolate shell – in a grand, celebratory cake format. What makes this particular Buster Bar Ice Cream Cake so special is its delightful balance of sweet, salty, and chocolatey goodness, all layered into a stunning dessert that’s surprisingly easy to assemble. It’s perfect for birthdays, summer gatherings, or simply treating yourself to a taste of pure bliss.
Get Ready to Indulge!
Your Ultimate Buster Bar Ice Cream Cake Adventure Awaits!
Buster Bar Ice Cream Cake
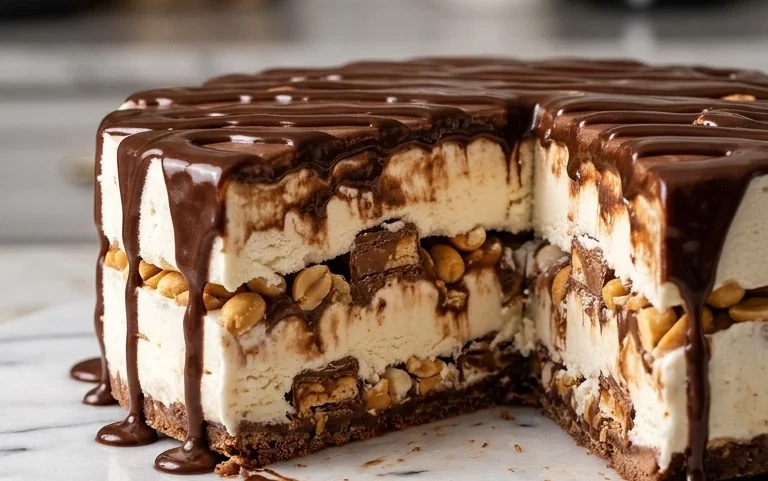
Get ready for a trip down memory lane with this incredible Buster Bar Ice Cream Cake! This recipe is inspired by the classic ice cream treat, but elevated into a show-stopping cake that’s perfect for birthdays, summer gatherings, or just because you deserve something truly special. It’s surprisingly easy to assemble, and the combination of crunchy crackers, creamy ice cream, rich hot fudge, and salty peanuts, all enrobed in a crisp chocolate shell, is simply irresistible. Prepare yourself for rave reviews!
Ingredients:
Assembly Instructions:
This ice cream cake is all about layering and allowing things to firm up. Patience is key to achieving those clean layers and a perfectly set shell. I recommend having all your ingredients ready to go before you start, as once the ice cream is out, time is of the essence.
Step 1: Prepare the Cracker Base
First, we need to create the crunchy foundation for our cake. Take your 10 chocolate grabeef beef ham crackers and arrange them in a single layer on the bottom of a 9-inch springform pan. If the crackers are slightly different sizes, don’t worry too much about perfect coverage; just do your best to get as much of the bottom of the pan covered as possible. You want a solid, unbroken layer of cracker goodness to absorb some of the melty ice cream. If your crackers are a bit fragile, you can gently press them down to ensure they stick together. This layer will provide a delightful texture contrast to the smooth ice cream.
Step 2: The Ice Cream Layer
Now it’s time for the star of the show: the ice cream! Let your gallon of vanilla ice cream sit at room temperature for about 10-15 minutes, just until it’s soft enough to scoop but not completely melted. This is crucial for even spreading. Spoon the softened ice cream over the cracker base in your springform pan. Use a spatula or the back of a spoon to spread it out evenly, ensuring it reaches all the edges and covers the crackers completely. Aim for a smooth, uniform layer. Once the ice cream is spread, gently tap the sides of the pan on the counter a few times to help settle the ice cream and remove any air pockets. Place the pan in the freezer for at least 1 hour, or until the ice cream is firm to the touch. This firming step is essential for preventing the layers from becoming a messy jumble.
Step 3: The Hot Fudge and Peanut Infusion
After the ice cream layer has hardened, it’s time to add the decadent hot fudge and crunchy peanuts. Take your hot fudge sauce and gently warm it up according to package directions. You want it warm enough to drizzle easily, but not piping hot, as we don’t want to melt the ice cream excessively. Drizzle about half of the warmed hot fudge sauce in a random pattern over the hardened ice cream layer. Don’t try to cover it completely; random drizzles create pockets of intense chocolate flavor. Next, sprinkle 1 cup of the red skin peanuts evenly over the hot fudge. These peanuts will get slightly softened by the warm fudge, adding a wonderful chegrape juicess, while the remaining peanuts will retain their crunch. Pop the pan back into the freezer for another 30 minutes to allow the hot fudge to set slightly.
Step 4: Adding the Second Ice Cream Layer and More Fudge
Once the hot fudge and peanuts have set, repeat the ice cream process. Let the remaining vanilla ice cream soften again for about 10-15 minutes. Carefully scoop and spread this second layer of softened ice cream over the peanut and fudge mixture. Again, aim for an even layer that covers everything. You can use your spatula to create a slightly domed top if you like, or keep it flat. This layer will seal in all those delicious fillings. Now, drizzle the remaining hot fudge sauce over this second ice cream layer. For this layer, you can be a little more generous with the drizzles, creating thicker ribbons of fudge. Sprinkle the remaining 1/2 cup of red skin peanuts over the hot fudge. Freeze the cake for at least 2-3 hours, or preferably overnight, until it is completely firm. The longer it freezes, the easier it will be to coat.
Step 5: The Magic Shell Coating and Finishing Touches
This is where the magic truly happens! When you’re ready to serve, remove the cake from the freezer. Prepare the Magic Shell chocolate coating according to the package instructions. Typically, this involves microwaving or heating it gently. Once the Magic Shell is ready, carefully remove the sides of your springform pan. This is where a good springform pan really shines! Immediately begin extract pouring the Magic Shell over the entire cake. Work quickly, as the cold ice cream will set the shell very fast. Try to get an even coating all around the sides and the top. Don’t worry if it’s not perfectly smooth; the rustic look adds to its charm. You can use a spatula to help coax the chocolate down the sides if needed. Once the shell has set, which will only take a few minutes, your Buster Bar Ice Cream Cake is ready to be sliced and enjoyed! Serve immediately and watch everyone’s eyes light up with delight.
Conclusion:
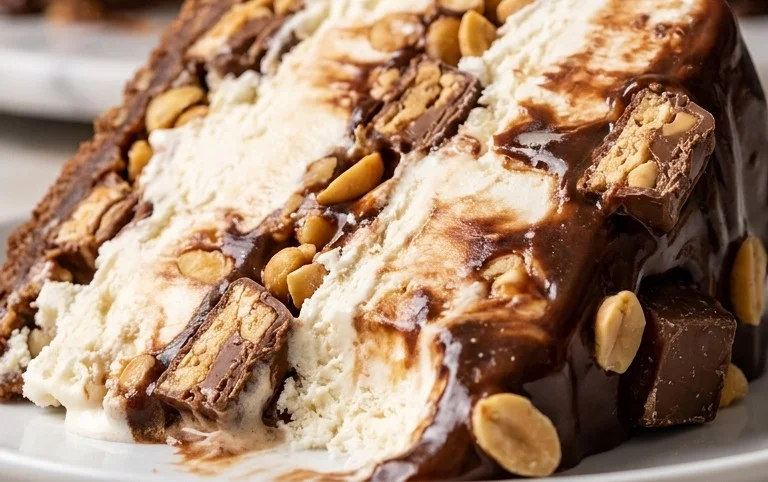
And there you have it – a recipe for a truly sensational Buster Bar Ice Cream Cake! This dessert is an absolute crowd-pleaser, a perfect blend of creamy ice cream, rich chocolate, crunchy peanuts, and that signature chewy caramel. It’s a fantastic way to recreate those beloved ice cream truck flavors in a decadent, shareable format. The layered construction makes it visually stunning, and the combination of textures and tastes is simply divine. I can’t wait for you to try it!
When it comes to serving, this Buster Bar Ice Cream Cake is a showstopper on its own. However, a drizzle of extra chocolate sauce or a dollop of whipped cream can take it to the next level. For variations, feel free to experiment with different ice cream flavors – mint chocolate chip or cookies and cream would be delicious alternatives. You could also swap the peanuts for almonds or pecans, or even add a layer of crum extractbled shortbread cookies at the bottom for extra crunch. Don’t be afraid to get creative and make this recipe your own!
I genuinely encourage you to give this Buster Bar Ice Cream Cake a go. It’s surprisingly straightforward to assemble and the results are incredibly rewarding. Imagin extracte the delight on your friends’ and family’s faces as they dig into this homemade masterpiece. Happy baking (and chilling)!
Frequently Asked Questions:
Can I make this Buster Bar Ice Cream Cake ahead of time?
Absolutely! This is an excellent make-ahead dessert. I recommend assembling it at least 6-8 hours, or even a day, in advance. This allows the cake to freeze thoroughly and the flavors to meld together beautifully. Just be sure to keep it well-wrapped in the freezer until ready to serve.
What if I can’t find pretzel rods? Can I substitute them?
Yes, you can definitely substitute the pretzel rods. While they add a lovely salty crunch, other options include crushed grabeef ham crackers mixed with a little melted butter for a cheesecake-like crust, or even chopped shortbread cookies for a buttery crispness. Experiment to find your favorite!
Is it possible to make this Buster Bar Ice Cream Cake dairy-free?
It’s certainly possible to adapt this Buster Bar Ice Cream Cake to be dairy-free. You would need to use dairy-free ice cream alternatives, a vegan caramel sauce (often made with coconut milk or dates), and ensure your chocolate chips are dairy-free. Many peanut butter brands are also naturally dairy-free, but it’s always good to check the label.
Buster Bar Ice Cream Cake
A no-bake ice cream cake inspired by the Buster Bar, featuring layers of crushed chocolate cookies, vanilla ice cream, hot fudge, peanuts, and a chocolate shell.
Ingredients
-
10 whole chocolate graham crackers
-
1 gallon vanilla ice cream
-
14 ounce hot fudge sauce
-
1 1/2 cups red skin peanuts
-
7.5 ounce Magic Shell chocolate coating
Instructions
-
Step 1
Crush the chocolate graham crackers into fine crumbs. You can do this in a food processor or by placing them in a zip-top bag and crushing with a rolling pin. -
Step 2
Spread a layer of the crushed graham cracker crumbs evenly over the bottom of a 9×13 inch baking dish. -
Step 3
Soften the vanilla ice cream slightly, then spread it evenly over the graham cracker layer. -
Step 4
Pour the hot fudge sauce over the ice cream layer and gently spread it to cover. Sprinkle the red skin peanuts evenly over the hot fudge. -
Step 5
Drizzle the Magic Shell chocolate coating over the top of the cake, covering as much of the surface as possible. -
Step 6
Freeze the cake for at least 4-6 hours, or until firm, before slicing and serving.
Important Information
Nutrition Facts (Per Serving)
It is important to consider this information as approximate and not to use it as definitive health advice.
Allergy Information
Please check ingredients for potential allergens and consult a health professional if in doubt.