Easy Mini Apple Pies- Delicious Dessert Recipe
Mini Apple Pies are the ultimate comfort food, condensed into perfectly portioned delights that are sure to bring a smile to your face. There’s something undeniably magical about biting into a warm, flaky crust that gives way to tender, spiced apples. We all love a classic apple pie, but these miniature versions offer an extra layer of charm and convenience. They’re perfect for parties, bake snon-alcoholic ales, or simply when you crave a sweet treat without committing to a whole pie. What truly makes these mini apple pies so special is their ability to capture all the heartwarming flavors of autumn in every bite, making them a delightful addition to any occasion. Whether you’re a seasoned baker or just starting out, these mini apple pies are surprisingly easy to make and incredibly rewarding.
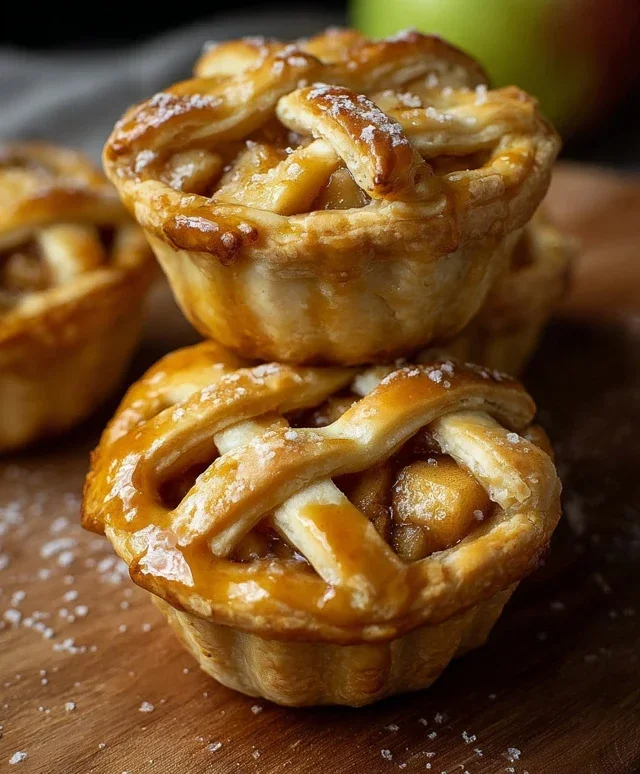
Mini Apple Pies
There’s something undeniably comforting about a warm apple pie. But sometimes, a whole pie feels like a commitment, or perhaps you’re just craving individual servings of pure apple-cinnamon bliss. That’s where these adorable mini apple pies come in! They’re perfect for parties, a sweet treat after dinner, or simply whenever the craving strikes. Using refrigerated pie crusts makes this recipe incredibly accessible, meaning you can whip up a batch of these delightful little pies with minimal fuss. They’re perfectly portioned, delightfully rustic, and bursting with the classic flavors of fall. Get ready to impress yourself and anyone lucky enough to snag one of these sweet little gems.
Ingredients:
Cooking Instructions:
Preparing the Pie Crusts
The first step to our delicious mini pies is to get our pie crusts ready. Carefully unroll your two refrigerated pie crusts onto a clean, lightly floured surface. For this recipe, we’re aiming for individual servings, so we’ll need to cut out circles from the crusts. A large cookie cutter or even a round lid from a container, about 4-5 inches in diameter, works wonderfully. You’ll want to get as many circles as possible from each crust – aim for at least 8 circles in total. Gently press these circles into the cups of a standard muffin tin. Don’t worry if the edges go up a bit; this will create a lovely little cup for our filling. If you don’t have a muffin tin, you can also place the crust circles on a baking sheet and form them into individual pie shells, though a muffin tin provides excellent support and helps them hold their shape beautifully. Place the prepared muffin tin with the crusts into the refrigerator to chill while you prepare the apple filling. This chilling step is important as it helps the crust firm up, which will prevent it from shrinking too much during baking and will result in a crispier crust.
Making the Apple Filling
Now for the star of the show: the apple filling! Peel, core, and chop your Granny Smith apples into small, bite-sized pieces. Granny Smith apples are a fantastic choice for pies because they hold their shape well when baked and offer a lovely tartness that balances the sweetness of the sugar. In a large bowl, combine the chopped apples with the granulated sugar and light brown sugar. The combination of sugars provides a rich, deep sweetness with a hint of caramel undertones from the brown sugar. Next, sprinkle in the ground cinnamon and ground nutmeg. These spices are the quintessential flavors of apple pie, infusing the filling with warmth and fragrance. Add the all-purpose flour. Flour acts as a thickener, ensuring your filling isn’t too runny once baked. Finally, stir in the vanilla extract. Vanilla adds another layer of complexity and enhances the overall apple flavor. Give everything a good stir until the apples are evenly coated with the sugar, spices, and flour mixture. Make sure there are no dry pockets of flour. This filling mixture should smell absolutely divine!
Assembling the Mini Pies
Once the apple filling is ready and your crusts are nicely chilled, it’s time to bring it all together. Take your muffin tin out of the refrigerator. Carefully spoon the prepared apple filling into each of the pie crust shells. You want to fill them generously, but don’t overstuff them to the point where the filling will spill over the edges during baking. A good rule of thumb is to fill them about three-quarters of the way full. You can then use any leftover scraps of pie crust to create decorative tops. You can cut out smaller shapes like leaves or stars, or simply cut thin strips to create a lattice effect over the filling. If you’re short on time or prefer a more rustic look, you can also simply leave them open-faced. This is also where the optional sanding sugar comes in. If you like a bit of sparkle and extra crunch on your pies, sprinkle a little sanding sugar over the top of the apple filling before baking. It really elevates the presentation!
Baking the Mini Pies to Golden Perfection
Preheat your oven to 375°F (190°C). Place the filled muffin tin on a baking sheet. This is a good practice to catch any potential drips and makes it easier to transfer the tin in and out of the oven. Bake for approximately 25-30 minutes, or until the crust is golden brown and the apple filling is bubbly. You’ll notice the filling starting to bubble around the edges, which is a sign that it’s cooked through and thickened. Keep an eye on the crust; if you notice any parts browning too quickly, you can loosely tent the muffin tin with aluminum foil.
Cooling and Enjoying Your Mini Masterpieces
Once the mini apple pies are baked to a beautiful golden brown and the filling is delightfully bubbly, carefully remove the muffin tin from the oven. Let the pies cool in the muffin tin for about 10-15 minutes. This initial cooling period is crucial for the pies to set properly. They will be very hot and delicate immediately after coming out of the oven, and allowing them to cool slightly in the tin will prevent them from falling apart when you try to remove them. After this initial cooling, you can gently loosen the edges of the pies with a knife or spatula and carefully lift them out of the muffin tin. Place them on a wire rack to cool completely. While they are absolutely delicious served warm, allowing them to cool allows the flavors to meld and the filling to fully set. Serve them plain, with a dusting of powdered sugar, or, for the ultimate indulgence, with a scoop of vanilla ice cream or a dollop of whipped cream. Enjoy every single bite of your homemade mini apple pies!

Conclusion:
I hope you’ve enjoyed learning how to make these delightful Mini Apple Pies! They are truly a fantastic recipe because they offer all the comforting flavors of a classic apple pie but in perfectly portioned, adorable packages. The golden, flaky crust and the warm, spiced apple filling create a taste of autumn that’s perfect any time of year. Whether you’re looking for a charming dessert for a party, a sweet treat for yourself, or a fun baking project to do with family, these mini pies deliver.
For serving, I love to enjoy them warm, perhaps with a scoop of vanilla ice cream or a dollop of whipped cream. They also make wonderful individual desserts for a special occasion. Don’t be afraid to get creative with variations! You could add a sprinkle of cinnamon sugar to the crust before baking, incorporate a handful of raisins or dried cranberries into the apple filling, or even use different types of apples for a more complex flavor profile. I truly encourage you to give this recipe a try; I’m confident you’ll fall in love with these charming little pies!
Frequently Asked Questions:
Can I make the pie crust ahead of time?
Yes, absolutely! You can prepare the pie crust dough a day or two in advance and store it in the refrigerator. Just be sure to let it sit at room temperature for about 15-20 minutes before rolling it out to make it more pliable.
What kind of apples work best for these mini pies?
A mix of apples often yields the best flavor and texture. I recommend using a combination of sweet and tart apples, such as Honeycrisp, Gala, Granny Smith, or Fuji. This balance ensures your filling isn’t too sweet or too sour.
How should I store leftover mini apple pies?
Store any leftover mini apple pies in an airtight container at room temperature for up to two days, or in the refrigerator for up to four days. Reheat them gently in a toaster oven or a conventional oven to restore their crispness.
Mini Apple Pies
Delightful individual apple pies perfect for any occasion. Flaky crust filled with a sweet and spiced apple mixture.
Ingredients
-
2 refrigerated pie crusts
-
3 cups chopped Granny Smith apples
-
1/4 cup granulated sugar
-
1/4 cup light brown sugar
-
1 teaspoon ground cinnamon
-
1/4 teaspoon ground nutmeg
-
2 tablespoons all-purpose flour
-
1 teaspoon vanilla extract
-
1 egg
-
1 tablespoon water
-
Sanding sugar (optional)
Instructions
-
Step 1
Preheat oven to 375°F (190°C). Unroll pie crusts and use a 4-inch round cutter to cut out circles. Press circles into muffin tin cups to form mini pie shells. -
Step 2
In a large bowl, combine chopped apples, granulated sugar, light brown sugar, cinnamon, nutmeg, and flour. Mix well until apples are evenly coated. -
Step 3
Stir in the vanilla extract. Spoon the apple mixture evenly into the prepared mini pie shells. -
Step 4
In a small bowl, whisk together the egg and water to create an egg wash. Brush the edges of the pie crusts with the egg wash. -
Step 5
Sprinkle sanding sugar over the apples and crust edges, if desired. -
Step 6
Bake for 20-25 minutes, or until the crust is golden brown and the filling is bubbly. -
Step 7
Let cool in the muffin tin for a few minutes before carefully removing to a wire rack to cool completely.
Important Information
Nutrition Facts (Per Serving)
It is important to consider this information as approximate and not to use it as definitive health advice.
Allergy Information
Please check ingredients for potential allergens and consult a health professional if in doubt.