Easy No-Bake Patriotic Cheesecake Recipe
No Bake Patriotic Cheesecake is the ultimate crowd-pleaser, especially when those red, white, and blue celebrations roll around! Imagin extracte sinking your spoon into layers of creamy, dreamy cheesecake, bursting with vibrant fruit flavors and a hint of patriotic spirit. There’s just something incredibly satisfying about a dessert that looks as spectacular as it tastes, and this No Bake Patriotic Cheesecake delivers on all fronts. It’s the perfect way to add a touch of festive flair to your summer gatherings, from backyard barbecues to Fourth of July parties, without heating up the kitchen. The beauty of this recipe lies in its simplicity; it’s incredibly forgiving and requires absolutely no oven time, making it a stress-free option for even the busiest hosts. Plus, who can resist those stunning layers of color? It’s a dessert that truly embodies the joy and festivity of the season.
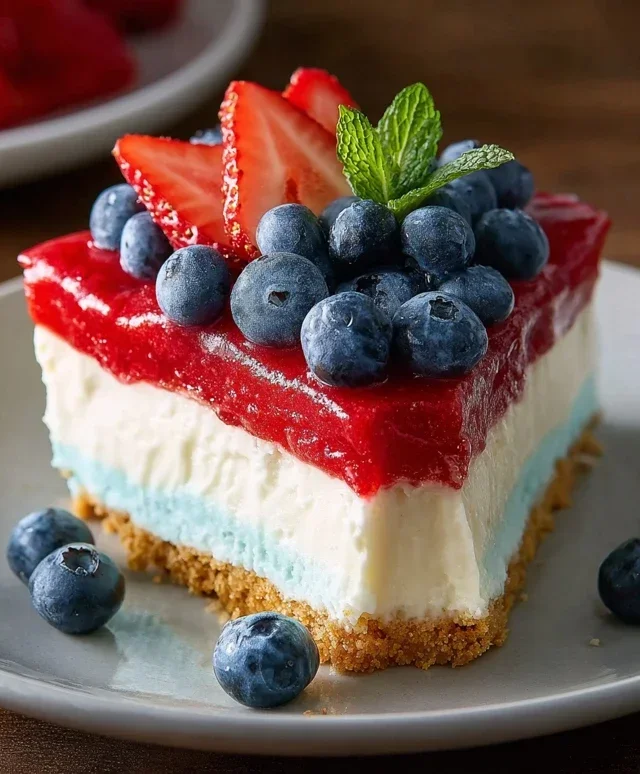
No Bake Patriotic Cheesecake
This No Bake Patriotic Cheesecake is the ultimate showstopper for any summer gathering, Fourth of July celebration, or even just a fun way to add some festive flair to your dessert table. Imagin extracte a creamy, dreamy cheesecake filling layered with vibrant colors, nestled on a buttery golden Oreo crust, and topped with fresh blueberries. The best part? No oven required! This recipe is surprisingly simple to assemble, making it perfect for bakers of all skill levels. It’s a dessert that tastes as good as it looks, and the combination of sweet, tangy, and creamy is simply irresistible. Get ready to impress your friends and family with this stunning and delicious patriotic treat.
Ingredients:
Instructions:
Crust Preparation
1. Begin extract by preparing the foundation of your spectacular cheesecake: the crust. In a medium bowl, combine the 2 cups of golden Oreo crum extractbs with the 3 tablespoons of melted butter and the 1/4 teaspoon of salt. Mix these ingredients together thoroughly until all the crum extractbs are moistened and the mixture resembles wet sand. This ensures a cohesive crust that won’t crum extractble when you slice into your masterpiece. Press this mixture firmly and evenly into the bottom of a 9-inch springform pan. Use the flat bottom of a measuring cup or glass to get a nice, compact layer. For an extra sturdy crust, you can chill it in the refrigerator for at least 15-20 minutes while you prepare the filling. This chilling step helps the butter solidify, making the crust firm and easier to handle.
Red Layer Assembly
2. Now, let’s create the vibrant red layer. In a large bowl, beat together the two softened 8 oz packages of cream cheese until it’s completely smooth and free of lumps. This is crucial for a creamy texture, so don’t rush this step. Gradually add the 2 cups of powdered sugar and the 2 teaspoons of vanilla extract to the cream cheese, beating until well combined and fluffy. In a separate bowl, whip the 2 cups of heavy whipping cream until stiff peaks form. Be careful not to over-whip, or you’ll end up with butter! Gently fold about half of the whipped cream into the cream cheese mixture. This will lighten the texture. Then, carefully fold in the remaining whipped cream until just combined. Divide this white filling into two equal portions. To one portion, add the 1 teaspoon of red gel food color and mix until you achieve a vibrant, consistent red hue. Gel food coloring is preferred because it’s more concentrated and won’t thin out your filling as much as liquid food coloring. Spoon this red filling over the prepared crust, spreading it evenly to create a smooth top.
Blue Layer Creation
3. Next, we’ll assemble the dazzling blue layer. In a heatproof bowl, dissolve the 1 package of blue raspberry Jell-O in 1 cup of boiling water. Stir until the Jell-O powder is completely dissolved and there are no granules remaining. Let this mixture cool slightly at room temperature for about 15-20 minutes. It should still be liquid but not piping hot. While the Jell-O cools, in a separate bowl, beat together the 6 oz of softened cream cheese with the 6 tablespoons of softened butter until very smooth and creamy. Gradually beat in the 3 cups of powdered sugar and the 1 teaspoon of vanilla extract until you have a smooth, luscious frosting-like mixture. Once the Jell-O has cooled slightly, gradually whisk it into the cream cheese and butter mixture. Continue whisking until everything is well combined and the mixture is smooth and free of lumps. This blue layer will be slightly more fluid than the white filling, but it will set up beautifully.
Assembling and Layering
4. With your red layer already chilling in the refrigerator (it’s a good idea to let it set for at least 30 minutes before adding the next layer), it’s time to add the blue. Carefully spoon the blue Jell-O mixture over the set red layer. Gently spread it out to create an even surface. For the best visual effect and to ensure distinct layers, you might want to gently tap the springform pan on the counter a few times to help settle the blue layer and remove any air bubbles. Pop the entire cheesecake back into the refrigerator to chill and set completely. This will take at least 4-6 hours, but overnight is even better for a firm, sliceable cheesecake. Patience is key for a beautifully layered no-bake cheesecake!
Finishing Touches and Serving
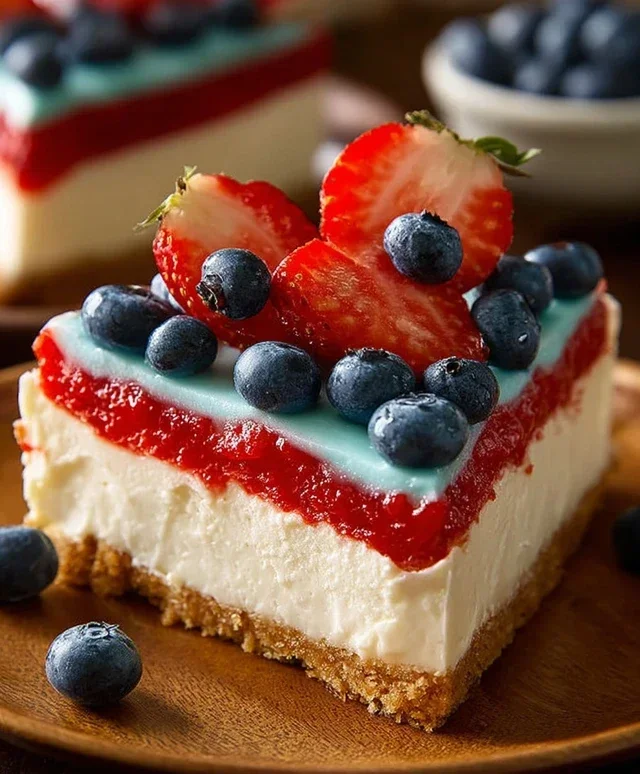
5. Once your cheesecake is fully set and firm, it’s time for the final, festive flourish. Carefully run a thin knife around the edge of the springform pan to loosen the cheesecake before releasing the sides. Arrange a generous handful of fresh blueberries on top of the blue layer to create the “stars” of your patriotic design. You can arrange them in rows, a star shape, or simply scatter them for a naturally beautiful look. The contrast of the vibrant blue, the white of the cream cheese, and the deep blue of the blueberries is truly stunning. Slice and serve this No Bake Patriotic Cheesecake cold. It’s a refreshing and delicious way to celebrate any occasion and a guaranteed crowd-pleaser. Enjoy every creamy, fruity bite!
Conclusion:
And there you have it – your guide to creating a stunning and utterly delicious No Bake Patriotic Cheesecake! This recipe is a winner because it’s incredibly easy, requiring no oven time, which is a lifesaver during warm weather or when you’re short on kitchen space. The creamy, dreamy cheesecake filling layered with vibrant red and blue fruit creates a visually spectacular dessert that’s perfect for any summer gathering, from Fourth of July barbecues to Memorial Day picnics. Plus, the simple grabeef ham cracker crust provides a delightful crunchy contrast. I encourage you to give this No Bake Patriotic Cheesecake a try; it’s guaranteed to impress your guests and be a hit with everyone!
Serving suggestions are endless! This cheesecake is fantastic on its own, but you can elevate it with a dollop of whipped cream, fresh berries, or even a sprinkle of edible glitter for an extra patriotic sparkle. For variations, consider adding a swirl of strawberry puree or blueberry compote directly into the white cheesecake filling for a more integrated color and flavor. You could also swap the grabeef ham cracker crust for an Oreo cookie crust for a richer taste.
Frequently Asked Questions:
Can I make this cheesecake ahead of time?
Absolutely! This No Bake Patriotic Cheesecake is perfect for making ahead. In fact, it’s best when chilled for at least 6-8 hours, or preferably overnight. This allows the flavors to meld and the cheesecake to set up perfectly.
What kind of fruit is best for the patriotic layers?
For the red layer, fresh strawberries, raspberries, or even cherry pie filling work wonderfully. For the blue layer, fresh blueberries or a blueberry sauce are excellent choices. Just ensure the fruit is pureed or chopped finely enough to spread easily.
How long will this cheesecake last in the refrigerator?
Stored properly in an airtight container in the refrigerator, your No Bake Patriotic Cheesecake should stay fresh and delicious for up to 3-4 days.
No Bake Patriotic Cheesecake
A vibrant and festive no-bake cheesecake with layers of red, white, and blue, perfect for patriotic holidays.
Ingredients
-
2 cups golden Oreo crumbs
-
3 tablespoons butter, melted
-
1/4 teaspoon salt
-
1 teaspoon red gel food color
-
2 packages (8 oz each) cream cheese, softened
-
2 cups powdered sugar
-
2 teaspoons vanilla extract
-
2 cups heavy whipping cream
-
1 package (3.94 oz) blue raspberry Jell-O
-
1 cup boiling water
-
6 oz cream cheese, softened
-
6 tablespoons butter, softened
-
3 cups powdered sugar
-
1 teaspoon vanilla extract
-
Fresh blueberries
Instructions
-
Step 1
For the crust: Combine golden Oreo crumbs, melted butter, and salt. Press firmly into the bottom of a 9-inch springform pan. -
Step 2
For the red layer: In a bowl, beat 2 packages of softened cream cheese with 2 cups powdered sugar and 2 teaspoons vanilla extract until smooth. Beat in red gel food coloring until evenly distributed. Fold in 1 cup of heavy whipping cream. -
Step 3
Pour the red mixture over the crust. Chill for 30 minutes or until set. -
Step 4
For the blue layer: Dissolve blue raspberry Jell-O in 1 cup boiling water. Let cool slightly. In a separate bowl, beat 6 oz softened cream cheese with 6 tablespoons softened butter and 3 cups powdered sugar until smooth. Add 1 teaspoon vanilla extract. Gradually beat in the cooled Jell-O mixture until combined. -
Step 5
Pour the blue mixture over the chilled red layer. Return to the refrigerator and chill for at least 4 hours, or until firm. -
Step 6
For the white layer: Whip the remaining 1 cup of heavy whipping cream until stiff peaks form. Spread this over the set blue layer as a topping. Decorate with fresh blueberries. -
Step 7
Slice and serve chilled.
Important Information
Nutrition Facts (Per Serving)
It is important to consider this information as approximate and not to use it as definitive health advice.
Allergy Information
Please check ingredients for potential allergens and consult a health professional if in doubt.