Oreo Caramel Cheesecake Recipe – Decadent & Easy
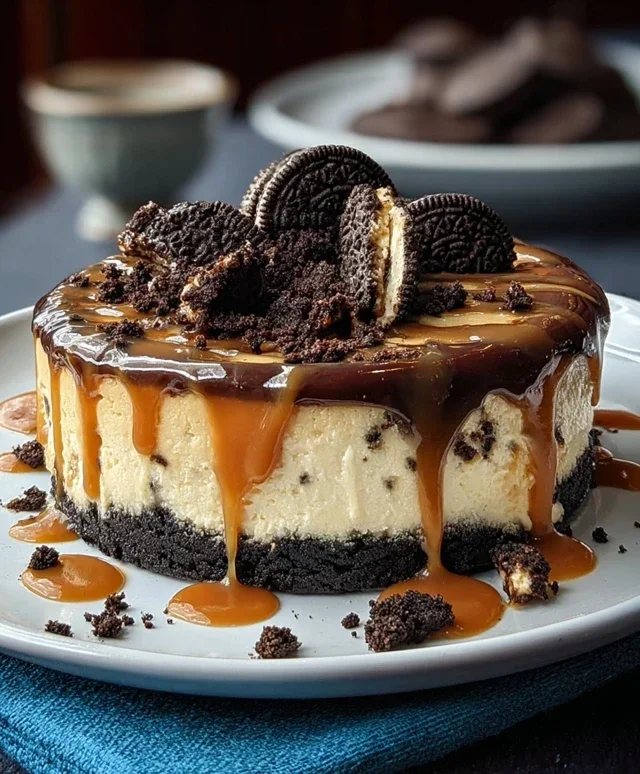
Oreo & Caramel Cheesecake. If there’s one dessert that consistently makes people swoon, it’s a decadent cheesecake. But elevate it with the irresistible crunch of Oreos and the gooey, sweet embrace of caramel, and you’ve got pure bliss. This Oreo & Caramel Cheesecake is more than just a dessert; it’s an experience. We all have those nostalgic food memories, and for many, Oreos are a cherished part of childhood. When you combine that familiar, satisfying cookie with the creamy, dreamy texture of a classic cheesecake, it’s a match made in heaven. What truly sets this Oreo & Caramel Cheesecake apart is the masterful balance of flavors and textures. The rich, dark chocolate of the Oreo crust provides a delightful contrast to the smooth, velvety cheesecake filling, all brought together by swirls and drizzles of luscious, golden caramel. Get ready to impress yourself and everyone lucky enough to share this masterpiece!
Oreo & Caramel Cheesecake
This Oreo & Caramel Cheesecake is a dream come true for any dessert lover. It’s a decadent, creamy cheesecake layered with the irresistible crunch of Oreos and swirled with rich caramel. The perfect balance of sweet and slightly salty, this cheesecake is sure to impress your friends and family. Don’t be intimidated by making cheesecake from scratch; this recipe is designed to be straightforward and rewarding.
Ingredients:
Getting Started: The Crust
The foundation of any great cheesecake is its crust, and this one is no exception. We’re using a delightful combination of crushed grabeef beef ham crackers (or if you prefer, Golden Oreos for an extra Oreo punch) to create a sweet and crunchy base.
1. Prepare the Crust Mixture: In a medium bowl, combine your 1 ½ cups of crushed grabeef beef ham crackers (or Golden Oreos) with ¼ cup of melted butter and 2 tablespoons of brown sugar. Stir everything together until the crum extractbs are evenly moistened by the butter and the brown sugar is well incorporated. It should resemble wet sand. This mixture will hold together nicely when pressed into the pan.
2. Form the Crust: Press the crum extractb mixture firmly and evenly into the bottom of a 9-inch springform pan. Make sure to press it up the sides a little as well, about half an inch, to create a sturdy edge for your cheesecake. You can use the bottom of a measuring cup or a flat glass to help compact the crum extractbs and create a smooth, even surface. This helps prevent the crust from crum extractbling when you slice the cheesecake later. Once pressed, place the springform pan in the freezer for about 10-15 minutes while you prepare the filling. This chilling step helps the crust set and become firmer, making it easier to handle.
Crafting the Creamy Filling
The heart of this cheesecake is its impossibly smooth and rich cream cheese filling. The key to a perfectly smooth filling is to ensure your cream cheese is truly softened and to avoid overmixing.
3. Creaming the Cream Cheese and Sugar: In a large bowl, beat the 24 ounces of softened cream cheese with 1 cup of granulated sugar until it is completely smooth and creamy. Make sure there are no lumps of cream cheese remaining. You can use an electric mixer on medium speed for this, or a sturdy whisk if you’re feeling ambitious. Gradually add the 3 large eggs, one at a time, beating just until each egg is incorporated before adding the next. Be careful not to overmix once the eggs are added; this can incorporate too much air, which can lead to cracks in your cheesecake. Scrape down the sides of the bowl frequently to ensure everything is evenly mixed.
4. Adding the Wet Ingredients and Flour: Next, gently stir in 1 cup of sour cream and 1 tablespoon of vanilla extract until just combined. The sour cream adds a wonderful tangin extractess and extra moisture, contributing to that signature creamy texture. Finally, sprinkle in 2 tablespoons of all-purpose flour and mix on low speed or by hand until just incorporated. The flour acts as a stabilizer, helping to prevent the cheesecake from cracking and ensuring a smooth, dense texture. Don’t overmix at this stage; we want to keep that filling as silky as possible.
Assembling and Baking the Masterpiece
Now comes the exciting part – adding in those delicious Oreo bits and getting ready for the bake. A water bath is crucial for even baking and preventing cracks.
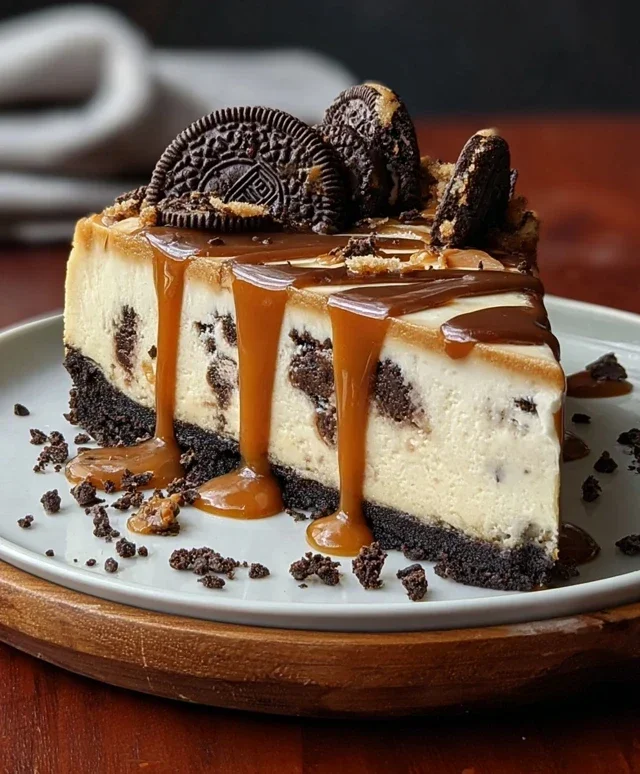
5. Folding in the Oreos and Preparing for the Water Bath: Gently fold in 1 cup of chopped Oreos (a mix of regular and golden ones) into the cream cheese mixture. You want to distribute them throughout the batter. Now, carefully pour about half of the cheesecake batter over the chilled crust. Sprinkle ½ cup of crushed Oreos (a mix of golden and chocolate) over this layer. Gently pour the remaining cheesecake batter over the crushed Oreos. If you have any extra white chocolate ganache, you can drizzle some over the top at this point for an extra layer of flavor. This is also the time to prepare your water bath. Wrap the outside of your springform pan securely in heavy-duty aluminum foil, ensuring no water can seep in. Place the foil-wrapped springform pan into a larger roasting pan. Carefully pour hot water into the roasting pan, so it comes about halfway up the sides of the springform pan. This water bath will ensure your cheesecake bakes evenly and slowly, resulting in a perfectly creamy texture and preventing cracks.
Baking and Cooling
Bake your cheesecake in a preheated oven at 325°F (160°C) for about 60-75 minutes, or until the edges are set but the center still has a slight jiggle. Once baked, turn off the oven and leave the cheesecake inside with the door ajar for about an hour. This gradual cooling process helps prevent cracking. After the hour, remove the cheesecake from the water bath and let it cool completely on a wire rack. Once it has reached room temperature, cover it and refrigerate for at least 6 hours, or preferably overnight, to allow it to set fully.
Finishing Touches
Before serving, drizzle generously with ½ cup of caramel sauce and the ½ cup of white chocolate ganache. The combination of the creamy cheesecake, crunchy Oreos, and sweet caramel is simply divine. Enjoy every decadent bite!
Conclusion:
There you have it – a recipe for an absolutely decadent Oreo & Caramel Cheesecake that I promise will be a showstopper! This cheesecake is the perfect marriage of creamy, rich cheesecake filling, the satisfying crunch of crushed Oreos in both the crust and filling, and the gooey, sweet indulgence of caramel sauce. It’s a guaranteed crowd-pleaser, whether you’re celebrating a special occasion or simply craving a truly magnificent dessert.
I love serving this Oreo & Caramel Cheesecake chilled, allowing the flavors to fully meld and the texture to set perfectly. A few extra drizzles of caramel sauce and perhaps a sprinkle of crushed Oreos or even a few whole ones on top make for a stunning presentation. For a delightful contrast, consider serving it with a dollop of unsweetened whipped cream or a scoop of vanilla bean ice cream. If you’re feeling adventurous, try adding some chopped toasted pecans or a swirl of chocolate ganache for an extra layer of deliciousness!
I wholeheartedly encourage you to give this Oreo & Caramel Cheesecake a try. It might seem like a project, but the steps are straightforward, and the reward is truly incredible. Get ready for the compliments to roll in!
Frequently Asked Questions:
Can I make this cheesecake ahead of time?
Absolutely! This Oreo & Caramel Cheesecake is actually best made the day before you plan to serve it. This allows the cheesecake to chill and set properly, enhancing its texture and allowing the flavors to deepen. Just make sure to cover it tightly with plastic wrap once it’s completely cooled.
What kind of caramel sauce should I use?
You can use your favorite store-bought caramel sauce for convenience, or for an extra special touch, you can make your own! A good quality, thick caramel sauce works best to ensure it holds its shape and adds that beautiful gooeyness. If your caramel is too thin, it might run off the sides of the cheesecake.
Can I freeze leftover cheesecake?
Yes, you can freeze leftover Oreo & Caramel Cheesecake. Wrap individual slices or the entire remaining portion tightly in plastic wrap, then in aluminum foil, and store in an airtight container or freezer bag. Thaw overnight in the refrigerator before serving.
Oreo & Caramel Cheesecake
A decadent cheesecake featuring a crushed graham cracker or Golden Oreo crust, filled with a creamy cheesecake batter studded with Oreos, and topped with caramel sauce and white chocolate ganache.
Ingredients
-
1 ½ cups crushed graham crackers (or Golden Oreos)
-
¼ cup melted butter
-
2 tbsp brown sugar
-
24 oz cream cheese, softened
-
1 cup granulated sugar
-
3 large eggs
-
1 cup sour cream
-
1 tbsp vanilla extract
-
2 tbsp all-purpose flour
-
1 cup chopped Oreos (regular & golden)
-
½ cup crushed Oreos (mix of golden & chocolate)
-
½ cup caramel sauce (for drizzling)
-
½ cup white chocolate ganache (for extra creaminess)
Instructions
-
Step 1
Preheat oven to 350°F (175°C). Grease a 9-inch springform pan. -
Step 2
Combine crushed graham crackers (or Golden Oreos), melted butter, and brown sugar. Press firmly into the bottom of the prepared pan to form the crust. -
Step 3
In a large bowl, beat cream cheese and granulated sugar until smooth. Beat in eggs one at a time until just combined. Stir in sour cream, vanilla extract, and all-purpose flour until smooth. -
Step 4
Gently fold in chopped Oreos and crushed Oreos. Pour batter over the crust. -
Step 5
Bake for 55-65 minutes, or until the edges are set and the center is slightly jiggly. Turn off the oven, crack the door open, and let the cheesecake cool in the oven for 1 hour. -
Step 6
Remove from oven and let cool completely on a wire rack. Chill in the refrigerator for at least 4 hours or overnight. -
Step 7
Before serving, drizzle with caramel sauce and white chocolate ganache.
Important Information
Nutrition Facts (Per Serving)
It is important to consider this information as approximate and not to use it as definitive health advice.
Allergy Information
Please check ingredients for potential allergens and consult a health professional if in doubt.