Super Cute Daisy Cupcakes – Easy & Adorable Dessert
Super Cute Daisy Cupcakes are about to bloom in your kitchen, and trust me, they’re guaranteed to be the highlight of any celebration or even just a Tuesday afternoon! There’s something incredibly charming about these delightful little treats, isn’t there? They bring an instant smile to your face with their whimsical design and their delicious, moist crum extractb. What I love most about these Super Cute Daisy Cupcakes is how they perfectly blend a simple, crowd-pleasing flavor with an absolutely adorable presentation that makes everyone feel a little bit special. They’re not overly complicated to make, but the result is a showstopper that will have your friends and family beggin extractg for the recipe. Get ready to create some edible sunshine!
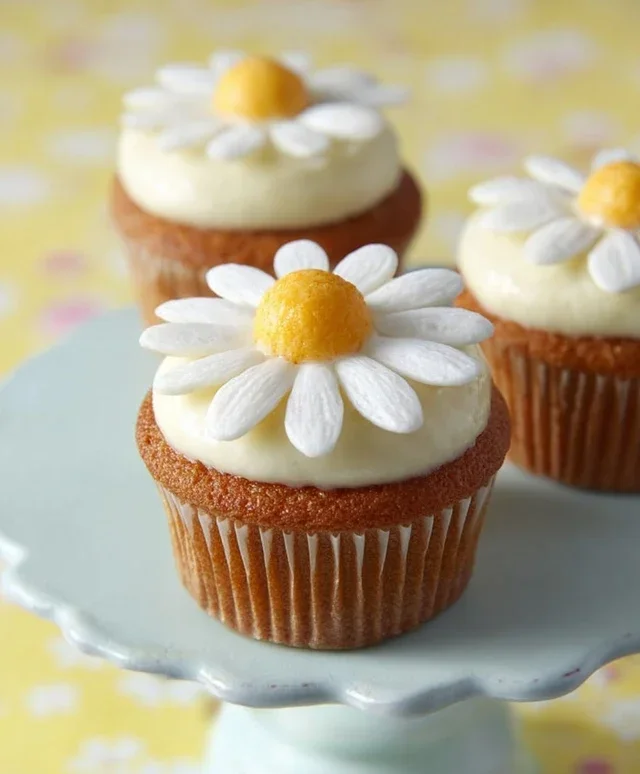
Super Cute Daisy Cupcakes
Get ready to bloom with joy because we’re diving into the delightful world of Super Cute Daisy Cupcakes! These adorable treats are perfect for brightening any occasion, from birthday parties to simple afternoon pick-me-ups. Their cheerful daisy design is surprisingly easy to achieve, and the moist, flavorful cake combined with creamy frosting makes them an absolute delight for your taste buds. I’ve always loved how a simple decoration can transform a regular cupcake into something truly special, and these daisy cupcakes are the perfect example. Let’s get baking and spread some floral happiness!
Ingredients:
Making the Daisy Cupcake Batter
The foundation of our super cute daisy cupcakes is a perfectly moist and tender vanilla cake. We’ll be using buttermilk, which is a magical ingredient for tenderizing baked goods, giving them a lovely softness and slight tang. If you don’t have buttermilk on hand, don’t worry! You can easily make your own. Simply measure out 140 ml of regular milk and stir in 1 tablespoon of white vinegar or lemon juice. Let it sit for about 5-10 minutes until it looks slightly curdled. This homemade version works just as well!
First, in a large bowl, cream together the 120g of soft unsalted butter and 150g of granulated sugar until the mixture is light and fluffy. This creaming process is crucial for incorporating air, which will contribute to the lightness of our cupcakes. I like to use an electric mixer for this, as it makes the job much easier and ensures a consistently smooth texture. Next, beat in the 2 eggs, one at a time, making sure each egg is fully incorporated before adding the next. Then, stir in 1 tablespoon of vanilla extract.
In a separate medium bowl, whisk together the 160g of all-purpose flour, 20g of corn starch, 1 teaspoon of baking powder, ½ teaspoon of baking soda, and 1 pinch of salt. The corn starch helps to create a finer, more tender crum extractb, so don’t skip it! Sifting these dry ingredients together is also a good practice to ensure everything is evenly distributed and to remove any lumps. Now, alternate adding the dry ingredients and the buttermilk to the wet ingredients. Start by adding about one-third of the dry ingredients to the butter mixture and mix until just combined. Then, add half of the buttermilk and mix again. Continue this process, ending with the dry ingredients. Be careful not to overmix the batter once the flour is added; overmixing can develop the gluten too much, resulting in a tougher cupcake. A few small lumps are perfectly fine.
Baking Your Daisy Cupcakes
Preheat your oven to 180°C (350°F). Line a standard muffin tin with cupcake liners. I usually fill each liner about two-thirds full. This allows the cupcakes to rise nicely without overflowing. Bake for 18-22 minutes, or until a toothpick inserted into the center of a cupcake comes out clean. Let the cupcakes cool in the muffin tin for about 5-10 minutes before transferring them to a wire rack to cool completely. It’s really important that they are completely cool before frosting, otherwise, your frosting will melt and slide right off!
Whipping Up the Cream Cheese Frosting
Now for the delicious part: the frosting that will become our canvas for those adorable daisies! In a large bowl, beat the 160g of cream cheese (make sure it’s at room temperature for about an hour – this prevents lumps!) and 100g of soft unsalted butter together until smooth and creamy. This might take a few minutes. Then, gradually add the 300g of icing sugar, a little at a time, mixing on low speed until it’s all incorporated. Once the icing sugar is combined, increase the speed and beat for another 2-3 minutes until the frosting is light and fluffy. Stir in 1 teaspoon of vanilla extract.
Creating the Daisy Design
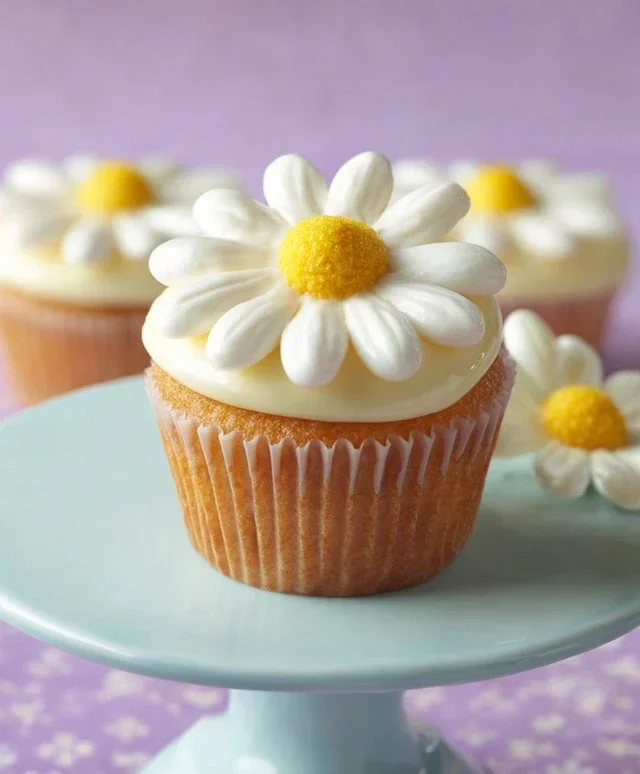
This is where the magic happens! We’ll use yellow and orange food coloring to create our daisy centers. Divide your frosting into three equal portions. Leave one portion plain white. In the second portion, add a few drops of yellow food coloring and mix until you achieve a vibrant yellow. In the third portion, add a few drops of orange food coloring and mix until you get a lovely orange hue. You can adjust the intensity of the colors to your liking.
Now, let’s assemble our daisies. Place the white frosting into a piping bag fitted with a large round tip. Fill the other two piping bags with the yellow and orange frosting, respectively. If you don’t have piping bags, you can use zip-top bags with the corner snipped off.
To create the petals, pipe white frosting onto the cooled cupcakes, starting from the outside edge and working your way in a circle. You want to create thick, overlapping petals. Don’t worry about perfection; a slightly irregular petal shape can actually make them look more natural. Once you have your white petals, take a small amount of the yellow or orange frosting and pipe a small dot in the center of each cupcake to create the daisy’s core. You can also use a toothpick to gently swirl the colors together for a more blended effect if you like. For an extra cute touch, you can even pipe a few green leaves around the base of some cupcakes using green-colored frosting (you’d need to color a small portion of your white frosting green for this!).
These Super Cute Daisy Cupcakes are ready to be admired and devoured! They’re a guaranteed way to bring smiles to faces. Enjoy every sweet, floral bite!
Conclusion:
And there you have it – your guide to creating the most absolutely adorable Super Cute Daisy Cupcakes! I truly believe this recipe is a winner because it’s not only visually stunning, perfect for brightening any occasion, but it’s also incredibly achievable for bakers of all skill levels. The tender vanilla cake base pairs beautifully with the sweet, creamy frosting, making these a delightful treat for both the eyes and the taste buds. These daisy cupcakes are guaranteed to bring smiles wherever they go, whether it’s for a birthday party, a baby shower, or just a sunny afternoon pick-me-up. Don’t hesitate to give them a try; you’ll be amazed at how simple it is to create such charming desserts!
For serving, these daisy cupcakes are fantastic on their own, but they also make a wonderful addition to a dessert table alongside other floral-themed treats or a beautiful bouquet of flowers. You can also get creative with variations! Consider adding a hint of lemon zest to the cake batter for a brighter flavor, or experiment with different frosting colors for the daisy petals – think cheerful yellows or vibrant pinks. Don’t be afraid to sprinkle a little edible glitter for extra sparkle!
Frequently Asked Questions:
Can I make these daisy cupcakes ahead of time?
Yes, absolutely! You can bake the cupcakes up to two days in advance and store them in an airtight container at room temperature. The frosting can also be made ahead and refrigerated. Bring the frosting back to room temperature and re-whip it before frosting the cooled cupcakes. This makes decorating day a breeze!
What kind of piping tip should I use for the daisy petals?
For the classic daisy look, I recommend using a petal tip (like a Wilton #104 or similar) to create the delicate petals. You can also achieve a lovely effect with a round tip for smaller centers and a star tip for more textured petals if you don’t have a petal tip on hand.
Are these Super Cute Daisy Cupcakes nut-free?
The base recipe is naturally nut-free, assuming you use standard vanilla extract and no nut-based additions. Always double-check your ingredient labels for any hidden nut ingredients to ensure they are safe for your guests with allergies.
Super Cute Daisy Cupcakes
Delightful vanilla cupcakes adorned with adorable daisy frosting, perfect for any celebration.
Ingredients
-
140 ml Buttermilk
-
120 g Soft unsalted butter
-
150 g Granulated sugar
-
2 Eggs
-
1 tbsp Vanilla extract
-
160 g All purpose flour
-
20 g Corn starch
-
1 tsp Baking powder
-
½ tsp Baking soda
-
1 pinch Salt
-
160 g Cream cheese, room temperature
-
100 g Soft unsalted butter
-
300 g Icing sugar
-
1 tsp Vanilla extract
-
Yellow food coloring
-
Orange food coloring
Instructions
-
Step 1
Preheat oven to 350°F (175°C). Line a 12-cup muffin tin with paper liners. -
Step 2
In a large bowl, cream together 120g soft unsalted butter and 150g granulated sugar until light and fluffy. Beat in 2 eggs one at a time, then stir in 1 tbsp vanilla extract. -
Step 3
In a separate bowl, whisk together 160g all purpose flour, 20g corn starch, 1 tsp baking powder, ½ tsp baking soda, and 1 pinch salt. -
Step 4
Gradually add the dry ingredients to the wet ingredients, alternating with 140ml buttermilk, beginning and ending with the dry ingredients. Mix until just combined. -
Step 5
Divide the batter evenly among the prepared muffin cups, filling each about two-thirds full. Bake for 18-20 minutes, or until a toothpick inserted into the center comes out clean. -
Step 6
Let cupcakes cool in the tin for a few minutes before transferring them to a wire rack to cool completely. -
Step 7
For the frosting, beat 160g cream cheese and 100g soft unsalted butter until smooth. Gradually add 300g icing sugar and 1 tsp vanilla extract, beating until light and fluffy. -
Step 8
Divide the frosting into three portions. Tint one portion yellow, another orange, and leave one white. -
Step 9
Decorate the cooled cupcakes with the frosting to resemble daisies.
Important Information
Nutrition Facts (Per Serving)
It is important to consider this information as approximate and not to use it as definitive health advice.
Allergy Information
Please check ingredients for potential allergens and consult a health professional if in doubt.