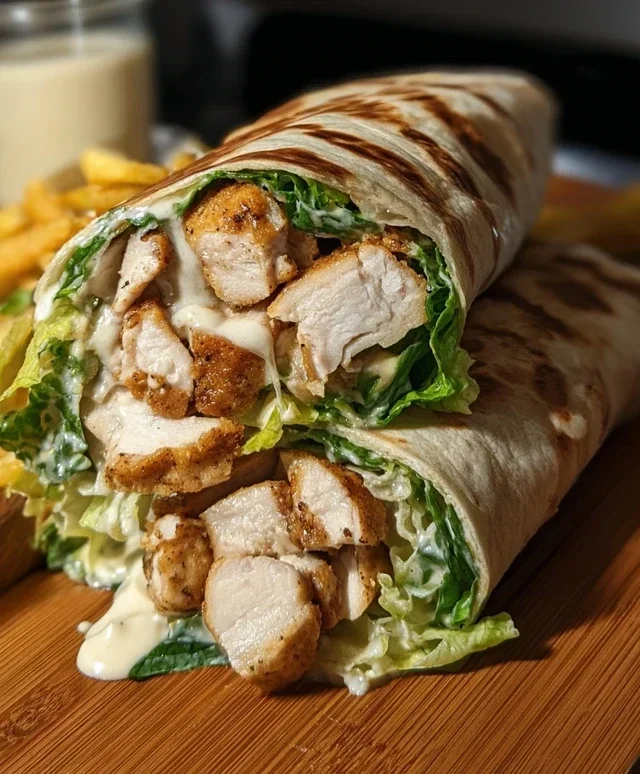
Easy Chicken Caesar Wraps – Quick & Delicious Lunch
Chicken Caesar Wraps are more than just a quick lunch; they’re a symphony of flavors and textures that have captured the hearts (and appetites!) of many. There’s something incredibly satisfying about the way tender, grilled chicken melds with crisp romaine lettuce, crunchy croutons, and that irresistibly creamy, tangy Caesar dressing, all hugged tightly within a soft tortilla. It’s the perfect combination of savory, fresh, and utterly delicious, making it a go-to for busy weeknights, picnic lunches, or even a light and satisfying dinner. What makes the humble Chicken Caesar Wrap so special? It’s its versatility and its comforting familiarity. You can customize it with your favorite additions, but the core elements deliver pure, unadulterated enjoyment every single time. Get ready to elevate your wrap game with this incredible recipe for Chicken Caesar Wraps!
Chicken Caesar Wraps
There’s something undeniably satisfying about a classic Caesar salad. The crisp romaine, the salty Parmesan, the creamy, tangy dressing – it’s a flavor combination that just works. But what if you want all those delicious flavors on the go, packed neatly into a portable meal? That’s where these Chicken Caesar Wraps come in! They’re incredibly easy to whip up, perfect for a quick lunch, a light dinner, or even for packing into a lunchbox. Plus, they offer a fantastic way to use up leftover cooked chicken if you have some on hand. This recipe is all about simplicity and maximum flavor, proving that you don’t need a lot of fuss to create something truly delicious. Let’s get started!
Ingredients:
Preparing the Chicken
The first step in creating our flavorful wraps is to prepare the chicken. For this recipe, I’m assuming you’re starting with raw chicken breasts. We need to cook them until they are juicy and tender. The easiest way to do this is by pan-searing them.
1. Season and Cook the Chicken: Pat your chicken breasts dry with paper towels. This helps create a better sear. Season both sides generously with salt and freshly ground black pepper. Heat a tablespoon of olive oil or your preferred cooking oil in a skillet over medium-high heat. Once the oil is shimmering, carefully place the seasoned chicken breasts into the hot pan. Cook for about 6-8 minutes per side, depending on the thickness of the breasts, until the chicken is cooked through and no longer pink in the center. You can check for doneness by cutting into the thickest part – the juices should run clear. If you’re in a hurry or prefer a different method, you can also bake the chicken breasts at 375°F (190°C) for about 20-25 minutes, or until cooked through. Once cooked, remove the chicken from the skillet and let it rest on a cutting board for about 5-10 minutes. This resting period is crucial as it allows the juices to redistribute throughout the meat, resulting in a more tender and flavorful chicken. After resting, dice or shred the chicken into bite-sized pieces. This will make it easier to distribute evenly within the wraps.
Assembling the Wraps
Now that our chicken is cooked and ready to go, it’s time to bring all the delicious components together for the grand finnon-alcoholic ale: assembling the wraps! This is where the magic happens, transforming individual ingredients into a cohesive and satisfying meal.
2. Warm the Tortillas: To make our tortillas more pliable and less likely to crack when rolling, it’s a good idea to warm them slightly. You can do this in a few ways. My favorite is to quickly warm them one at a time in a dry skillet over medium heat for about 15-30 seconds per side, just until they are soft and flexible. Alternatively, you can microwave them for about 15-20 seconds, or wrap them in a damp paper towel and warm them in the microwave. Be careful not to overheat them, as they can become tough.
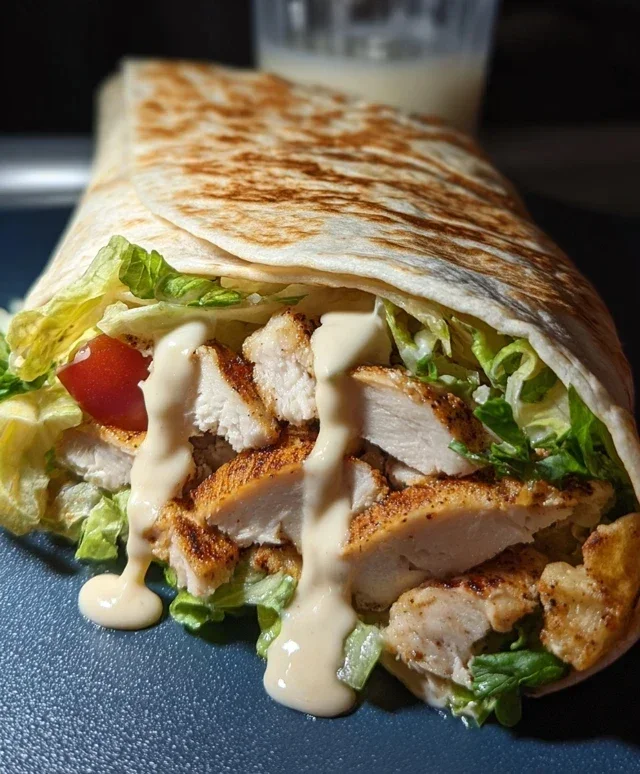
3. Layer the Ingredients: Lay a warmed tortilla flat on a clean surface. Start by spreading a generous amount of Caesar dressing across the center of the tortilla, leaving a border of about an inch around the edges. This dressing acts as our “glue” and provides the foundational flavor. Next, add a good portion of the chopped romaine lettuce. Don’t be shy with the lettuce; it adds a wonderful crunch and freshness.
4. Add the Chicken and Cheese: Evenly distribute the diced or shredded cooked chicken over the lettuce. Aim for a balanced amount in each wrap so every bite is equally delicious. Sprinkle a good amount of the grated Parmesan cheese over the chicken and lettuce. The Parmesan melts slightly into the warm ingredients and adds that signature salty, nutty flavor that is so integral to a Caesar wrap. Season with a little extra salt and pepper if you feel it’s needed, though the dressing and Parmesan often provide plenty of seasoning.
5. Roll ‘Em Up! This is the final, satisfying step. To roll your wrap, start by folding the bottom edge of the tortilla up and over the filling. Then, fold in the two sides, tucking them in snugly. Finally, roll the tortilla up tightly from the bottom, keeping the sides tucked in as you go. This technique helps to create a compact and mess-free wrap that’s perfect for eating. If your tortilla seems a bit loose, you can secure it with a toothpick. Repeat this process for all four tortillas, ensuring each one is generously filled and neatly rolled.
These Chicken Caesar Wraps are a perfect example of how simple ingredients can come together to create a meal that’s both comforting and exciting. They are incredibly versatile. If you have leftover rotisserie chicken, you can skip the cooking step and simply shred or dice it to add to the wraps. You can also add other ingredients like cherry tomatoes, croutons (for extra crunch!), or even a sprinkle of red pepper flakes for a bit of heat. Enjoy these delightful wraps for a quick and satisfying meal!
Conclusion:
There you have it! Our Chicken Caesar Wrap recipe is a true winner for so many reasons. It’s incredibly quick to put together, making it perfect for a busy weeknight dinner or a satisfying lunch on the go. The creamy Caesar dressing, tender chicken, crisp romaine lettuce, and the delightful crunch of croutons all come together in a flavor explosion that’s hard to resist. Plus, it’s easily customizable to suit your taste preferences. This is a recipe I come back to again and again, and I’m confident you’ll love it just as much.
For serving suggestions, these wraps are fantastic on their own, but they also pair wonderfully with a side of sweet potato fries, a fresh garden salad, or even a cup of tomato soup for a more substantial meal. Don’t be afraid to experiment with variations! You can swap out the chicken for grilled shrimp or even crispy baked tofu for a vegetarian option. Add a sprinkle of parmesan cheese inside the wrap for an extra cheesy kick, or incorporate some sun-dried tomatoes for a burst of Mediterranean flavor. Give this delightful Chicken Caesar Wrap recipe a try – I promise you won’t be disappointed!
Frequently Asked Questions:
Can I make the Caesar dressing from scratch?
Absolutely! While store-bought Caesar dressing is convenient, making it from scratch is surprisingly easy and often yields a fresher, more vibrant flavor. You’ll typically need ingredients like mayonnaise, anchovy paste (don’t skip this for authentic flavor!), Dijon mustard, garlic, lemon juice, and Worcestershire sauce. Whisk it all together until smooth and creamy!
What other vegetables can I add to my Chicken Caesar Wrap?
The beauty of this recipe is its versatility. Feel free to add other vegetables like thinly sliced red onion for a bit of bite, avocado for creaminess, cherry tomatoes for sweetness, or even some shredded carrots for extra crunch and color. Bell peppers, cucumber, and even a handful of spinach can also be delicious additions.
How can I make this wrap ahead of time?
You can prepare most components of the Chicken Caesar Wrap in advance. Cook and shred your chicken, chop your lettuce and other vegetables, and prepare your dressing. However, to prevent the tortilla from becoming soggy, it’s best to assemble the wraps just before you plan to eat them. You can store the fillings separately in airtight containers in the refrigerator.
Chicken Caesar Wraps
Quick and easy chicken Caesar wraps featuring grilled chicken, crisp romaine, Parmesan, and creamy Caesar dressing, all rolled up in a soft tortilla.
Ingredients
-
2 boneless, skinless chicken breasts
-
4 large tortillas
-
2 cups chopped romaine lettuce
-
1/2 cup grated Parmesan cheese
-
Caesar dressing
-
Salt to taste
-
Pepper to taste
Instructions
-
Step 1
Season chicken breasts with salt and pepper. Grill or pan-fry until cooked through and no longer pink inside. Let rest for 5 minutes, then slice or shred. -
Step 2
While chicken is cooking, wash and chop the romaine lettuce. -
Step 3
Warm the tortillas slightly if desired. This makes them more pliable. -
Step 4
Spread a generous amount of Caesar dressing onto each tortilla. -
Step 5
Layer the chopped romaine lettuce, cooked chicken, and grated Parmesan cheese down the center of each tortilla. -
Step 6
Fold in the sides of the tortilla, then tightly roll from the bottom up to create a wrap. -
Step 7
Cut wraps in half before serving, if desired.
Important Information
Nutrition Facts (Per Serving)
It is important to consider this information as approximate and not to use it as definitive health advice.
Allergy Information
Please check ingredients for potential allergens and consult a health professional if in doubt.