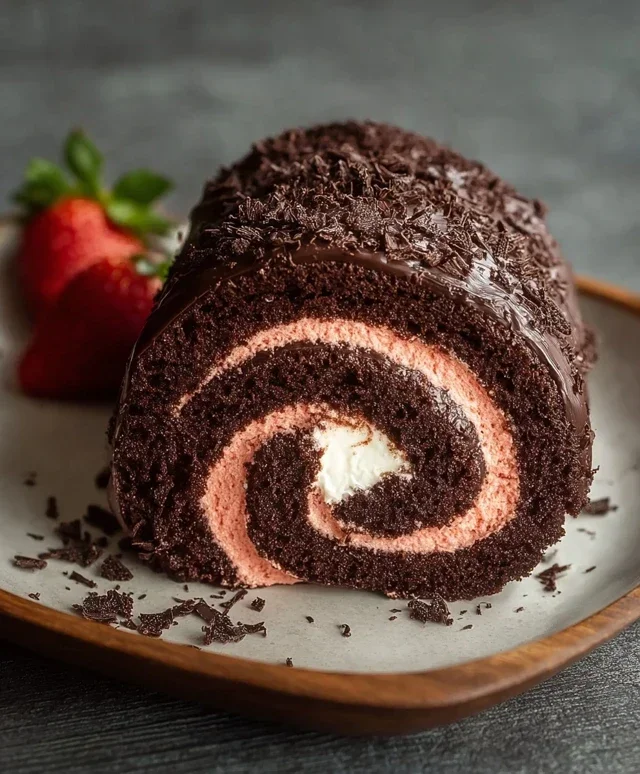
Easy Chocolate Swiss Roll Recipe-Simple Dessert Delight
Easy Chocolate Swiss Roll recipes are a magical gateway to creating a show-stopping dessert that’s surprisingly simple to master. If you’ve ever admired those perfectly swirled cakes in bakery windows and thought, “I could never make that,” prepare to be delightfully surprised! This easy chocolate Swiss roll is designed to banish any intimidation. We love a good Swiss roll because it offers that delightful combination of light, airy sponge cake and rich, luscious filling, all wrapped up in an elegant spiral. What makes this particular easy chocolate Swiss roll so special is its approachable nature. Forget fussy techniques; we’re focusing on maximum flavor and visual appeal with minimum fuss, ensuring even begin extractner bakers can achieve impressive results. Get ready to impress yourself and your loved ones with this delightful treat!
Easy Chocolate Swiss Roll
There’s something incredibly delightful about a Swiss roll. The soft, airy sponge, the rich filling, and the simple elegance of its rolled form make it a dessert that feels special, yet is surprisingly achievable. This recipe for an Easy Chocolate Swiss Roll is designed to be just that – a decadent treat that won’t leave you feeling intimidated. We’re using a blend of gluten-free flours and aquafaba to create a wonderfully tender sponge, and a luscious dairy-free chocolate buttercream for the filling. Get ready to impress yourself and your loved ones with this crowd-pleasing classic!
Ingredients:
Instructions:
Making the Chocolate Sponge
Preparing the Chocolate Raspberry Filling
Assembling the Swiss Roll

Conclusion:
And there you have it – our incredibly easy chocolate Swiss roll! I hope you’ve enjoyed learning how simple it is to create this impressive dessert. It truly is a showstopper that requires minimal fuss, making it perfect for begin extractners and experienced bakers alike. The light, airy sponge cake paired with a rich, creamy filling is simply divine. Whether you’re looking for a quick weekend treat, a stunning dessert for a dinner party, or just a way to satisfy a chocolate craving, this recipe delivers every time.
Serving suggestions are plentiful! This Swiss roll is delightful on its own, dusted with a little powdered sugar. However, you can elevate it further by serving it with a dollop of fresh whipped cream, a scattering of fresh berries like raspberries or strawberries, or even a drizzle of extra chocolate ganache. For variations, feel free to experiment with your filling! Consider adding a hint of coffee extract to the chocolate buttercream for a mocha twist, or swirl in some fruit puree for a fruity counterpoint. Don’t be afraid to get creative!
I truly encourage you to give this easy chocolate Swiss roll a try. You’ll be amazed at how quickly you can whip up something so delicious and beautiful. It’s a rewarding bake that brings smiles to everyone who tastes it.
Frequently Asked Questions:
Can I make the Swiss roll ahead of time?
Yes, absolutely! You can bake and fill the Swiss roll a day in advance. Wrap it tightly in plastic wrap and refrigerate. It will firm up beautifully, making it even easier to slice. Just remember to let it sit at room temperature for about 15-20 minutes before serving for the best texture.
My Swiss roll cracked when I rolled it. What did I do wrong?
Don’t worry, a little crack is very common and doesn’t affect the taste! It often happens if the cake is rolled too tightly while still warm, or if it’s a bit overbaked. Ensure your cake is slightly warm, not hot, when rolling. Rolling it up with the parchment paper attached can also help provide support and minimize cracking. For this easy chocolate Swiss roll, being gentle is key!
Easy Chocolate Swiss Roll
A simple and delicious gluten-free and dairy-free chocolate swiss roll recipe perfect for any occasion.
Ingredients
-
135 g oat flour
-
30 g cassava flour
-
30 g cocoa powder
-
1 tbsp arrowroot starch
-
1 1/2 tsp baking powder
-
1/2 tsp baking soda
-
122 mL aquafaba, room temperature
-
100 g organic granulated sugar or coconut sugar, divided
-
100 g unsweetened applesauce, room temperature
-
60 g unsweetened dairy free yogurt, room temperature
-
2 tbsp cocoa powder for dusting the dish towel
-
1 cup sliced strawberries, for garnish
-
226 g vegan butter, room temperature
-
70 g freeze dried strawberries, pulsed into a flour
-
Coconut fat from 1 can full-fat coconut cream
Instructions
-
Step 1
Preheat oven to 180°C (350°F). Line a 10×15 inch baking sheet with parchment paper. Dust a clean kitchen towel generously with 2 tbsp cocoa powder. -
Step 2
In a large bowl, whisk together oat flour, cassava flour, 30g cocoa powder, arrowroot starch, baking powder, and baking soda. -
Step 3
In a separate bowl, whisk together aquafaba and 100g sugar until stiff peaks form. Gently fold in applesauce and dairy-free yogurt. -
Step 4
Gradually add the dry ingredients to the wet ingredients, folding until just combined. Pour batter onto the prepared baking sheet and spread evenly. -
Step 5
Bake for 12-15 minutes, or until a toothpick inserted into the center comes out clean. Immediately invert the cake onto the prepared cocoa-dusted towel and peel off the parchment paper. Roll up the cake and towel together and let cool completely. -
Step 6
While the cake cools, prepare the frosting. Beat vegan butter until creamy. Add coconut fat and pulsed freeze-dried strawberries, and the remaining sugar, until smooth and fluffy. -
Step 7
Once the cake is cool, carefully unroll it. Spread a generous layer of frosting over the cake. Roll it back up tightly. Decorate with additional frosting and sliced strawberries.
Important Information
Nutrition Facts (Per Serving)
It is important to consider this information as approximate and not to use it as definitive health advice.
Allergy Information
Please check ingredients for potential allergens and consult a health professional if in doubt.