Easy St Patricks Day Cookies – Quick & Festive Treats
Easy St. Patrick’s Day Cookies are the perfect way to sprinkle a little bit of festive magic into your kitchen this March 17th! Who doesn’t love a cheerful green treat to celebrate the luck of the Irish? These cookies are more than just a sweet indulgence; they’re a simple, fun activity that brings smiles to faces of all ages. What makes these particular Easy St. Patrick’s Day Cookies so special is their foolproof nature. You don’t need to be a master baker to whip up a batch. They’re designed for maximum deliciousness with minimal fuss, making them ideal for last-minute celebrations or for involving little ones in the kitchen. Imagin extracte a table adorned with these vibrant green delights, ready to be shared and enjoyed. They’re a delightful reminder that sometimes, the easiest recipes are the most rewarding, especially when they bring a touch of playful spirit to a holiday.
Easy St. Patrick’s Day Cookies
Looking for a simple, fun, and festive treat to celebrate St. Patrick’s Day? You’ve come to the right place! These Easy St. Patrick’s Day Cookies are incredibly straightforward to make, requiring minimal effort and common pantry staples. The vibrant green color is a guaranteed crowd-pleaser, perfect for school parties, office gatherings, or just a delightful homemade snack to brighten your day. Forget complicated doughs and chilling times; these cookies come together in a flash, making them ideal for last-minute celebrations or when you have little helpers eager to join in the kitchen fun. The cake mix base ensures a wonderfully soft and tender cookie with a delightful sweetness that everyone will adore. Let’s get baking and spread some St. Paddy’s cheer!
Ingredients:
Making the Dough
The magic of these cookies starts with a cake mix. It’s one of my favorite shortcuts for achieving consistently delicious baked goods without the fuss of creaming butter and sugar from scratch. For our St. Patrick’s Day version, we’re going to infuse it with a cheerful, festive green hue.
1. Combine the Wet Ingredients: In a medium-sized mixing bowl, crack your two large eggs. Add the 1/3 cup of vegetable oil. Whisk these together until they are well combined and the mixture is a uniform color. This step ensures that the oil and eggs are properly incorporated, which helps create a tender crum extractb in your finished cookies. Don’t overmix; just a gentle whisk is perfect.
2. Add the Cake Mix and Food Coloring: Now, it’s time to introduce the star of the show: the white cake mix. Pour the entire contents of the 15.25 oz box into the bowl with the egg and oil mixture. At this point, you’ll also add the 1/4 teaspoon of Kelly green gel food coloring. Gel food coloring is preferable to liquid as it’s more concentrated and provides a richer, more vibrant color without adding extra moisture to your dough. Start with 1/4 teaspoon; you can always add a tiny bit more if you desire a deeper green, but be careful not to overdo it, as too much can affect the texture.
3. Mix the Dough: Using a sturdy spoon or a rubber spatula, begin extract to mix the ingredients together. The mixture will start off looking quite dry and crum extractbly, especially as you incorporate the cake mix. Keep mixing, scraping down the sides and bottom of the bowl as needed, until a soft, pliable dough begin extracts to form. You might think it’s not coming together, but be patient! Continue to mix until there are no dry pockets of cake mix remaining and the dough is a uniform, bright green color. The dough will be slightly sticky, which is exactly what we’re looking for. Avoid overmixing at this stage, as that can lead to tough cookies.
Shaping and Baking the Cookies
With our vibrant green dough ready, the next steps are all about transforming it into delightful cookies. This recipe makes for a wonderfully easy shaping process, and the baking time is quite short.
4. Form the Cookies and Add the Sugar Coating: Preheat your oven to 350°F (175°C). Line baking sheets with parchment paper or silicone baking mats. This is crucial for preventing the cookies from sticking and ensuring easy cleanup. In a separate shallow bowl or plate, place the 3 tablespoons of granulated sugar. Take about 1 tablespoon of the green cookie dough and roll it into a ball between your palms. Once you have a nice, round ball, gently roll it in the granulated sugar until it’s evenly coated. Place the sugared dough ball onto the prepared baking sheet, leaving about 2 inches between each cookie to allow for spreading. Repeat this process with the remaining dough. You should get approximately 24-30 cookies, depending on the size you make them.
5. Bake and Cool: Place the baking sheets into the preheated oven. Bake for 9-12 minutes, or until the edges of the cookies are lightly golden and the centers appear set but still soft. The exact baking time will depend on your oven and the size of your cookies, so keep an eye on them. You don’t want to overbake these, as they are meant to be soft and chewy. Once baked, remove the baking sheets from the oven and let the cookies cool on the sheets for 2-3 minutes. This allows them to firm up slightly before you move them. After the initial cooling period on the baking sheet, carefully transfer the cookies to a wire rack to cool completely.
Finishing Touches
While these cookies are delicious just as they are, a simple finishing touch can elevate them to the next level of festive charm.
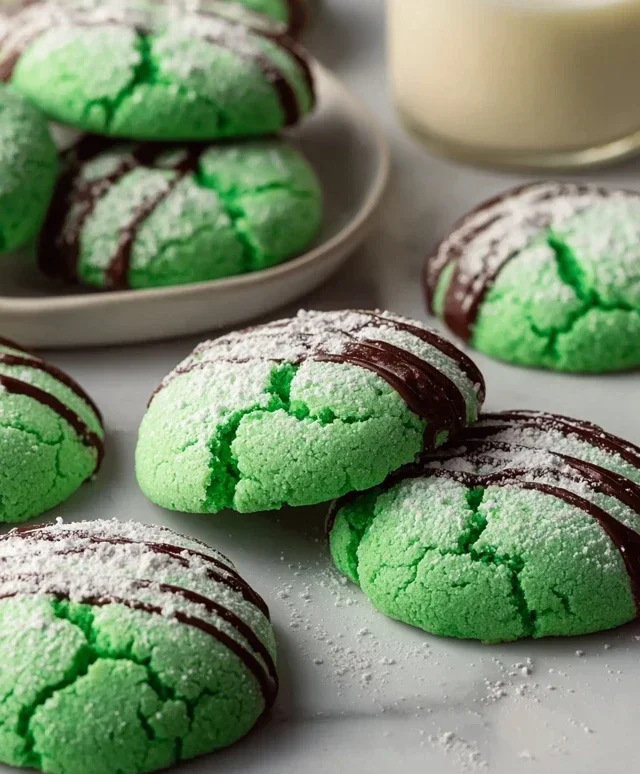
6. The Powdered Sugar Drizzle: Once the cookies have cooled completely, it’s time for a simple, sweet glaze that adds a touch of elegance and extra sweetness. In a small bowl, combine the 6 tablespoons of powdered sugar with about 1-2 tablespoons of milk or water. Stir until you have a smooth, drizzle-able consistency. You may need to adjust the amount of liquid slightly to get it just right – it should be thin enough to drizzle but not so thin that it runs off the cookies too quickly. Using a spoon or a fork, drizzle the powdered sugar glaze over the cooled green cookies in a decorative pattern. Let the glaze set for about 15-20 minutes before serving or storing. This final step adds a beautiful contrast and an extra layer of sweetness that perfectly complements the soft cake cookie.
Enjoy your incredibly easy and undeniably festive Easy St. Patrick’s Day Cookies! They are perfect for sharing and are sure to bring a smile to everyone’s face.
Conclusion:
And there you have it – your guide to creating these incredibly easy St. Patrick’s Day cookies! This recipe truly shines because of its simplicity and the sheer joy it brings. You don’t need to be a master baker to whip up a batch of these festive treats, making them perfect for a last-minute addition to your St. Paddy’s Day celebrations or a fun activity to do with the kids. The resulting cookies are wonderfully soft and subtly sweet, providing the perfect canvas for your creative green decorating! They’re fantastic on their own, but imagin extracte them served alongside a cool glass of milk or a warm cup of tea. For an extra festive touch, consider arrangin extractg them on a platter with some sbeef hamrock candies or green M&Ms.
Don’t be afraid to get creative with the decorations! Beyond the basic green icing, you could try adding edible glitter for sparkle, sprinkles in gold or white, or even little candy sbeef hamrocks. If you’re feeling adventurous, you could even experiment with adding a hint of peppermint extract to the dough for a minty twist! I highly encourage you to give these easy St. Patrick’s Day cookies a try. They’re guaranteed to spread smiles and bring a touch of Irish cheer to your home.
Frequently Asked Questions:
Q1: How can I make these cookies more green?
A1: The easiest way to make them more green is by using green food coloring in your icing. You can also incorporate green sprinkles or edible green glitter. For a more natural green hue, you could try adding a very small amount of matcha powder to the dough itself, though this will subtly alter the flavor.
Q2: Can I make these cookies ahead of time?
A2: Absolutely! These cookies can be baked and stored in an airtight container at room temperature for up to 3-4 days. For best results, it’s recommended to ice them just before serving or within a day of baking to prevent the icing from becoming too hard or the cookies from becoming soggy.
Q3: What other fun shapes can I cut these cookies into?
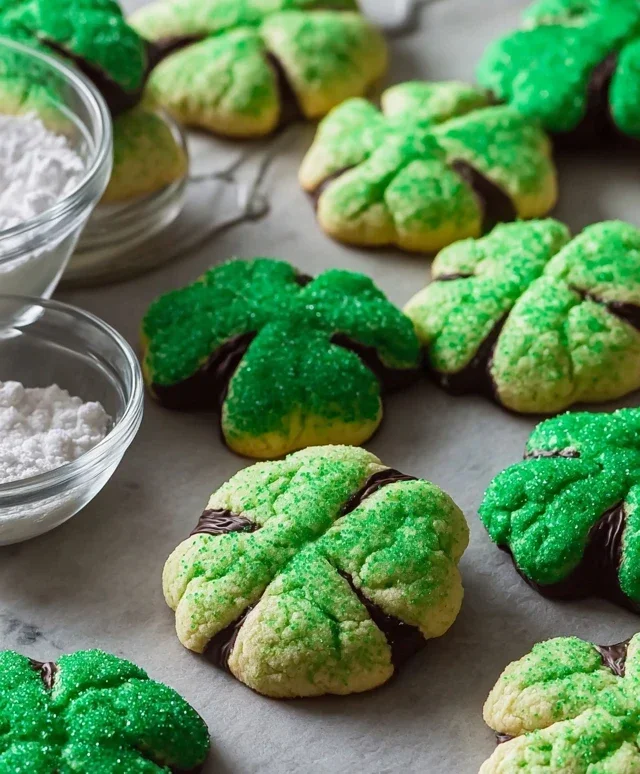
A3: While sbeef hamrocks are classic, feel free to get creative! You can use any St. Patrick’s Day themed cookie cutters you have, such as leprechaun hats, pots of gold, or even simple circles or squares. The recipe is forgiving enough to work with various shapes.
Easy St. Patrick’s Day Cookies
Simple and festive green cookies perfect for St. Patrick’s Day celebrations.
Ingredients
-
1 box (15.25 oz) white cake mix (about 3 cups)
-
2 large eggs
-
1/3 cup vegetable oil
-
1/4 teaspoon Kelly green gel food coloring
-
3 tablespoons granulated sugar
-
6 tablespoons powdered sugar
Instructions
-
Step 1
Preheat oven to 350°F (175°C) and line baking sheets with parchment paper. -
Step 2
In a large bowl, combine the white cake mix, eggs, and vegetable oil. -
Step 3
Mix until well combined. Add the Kelly green gel food coloring and mix until the dough is evenly colored. -
Step 4
Roll the dough into 1-inch balls and then roll each ball in the granulated sugar. -
Step 5
Place the cookie balls onto the prepared baking sheets, about 2 inches apart. -
Step 6
Bake for 8-10 minutes, or until the edges are lightly golden. -
Step 7
Let the cookies cool on the baking sheets for a few minutes before transferring them to a wire rack to cool completely. -
Step 8
Once cooled, lightly dust the cookies with powdered sugar for a festive finish.
Important Information
Nutrition Facts (Per Serving)
It is important to consider this information as approximate and not to use it as definitive health advice.
Allergy Information
Please check ingredients for potential allergens and consult a health professional if in doubt.